Build your First Workflow Workshop
#
Build your first Workflow Application with Flows for APEX
Flows for APEX is a BPMN-based business process modeling tool and workflow engine built with, and for, the Oracle APEX low code development platform. Flows for APEX enables every APEX developer to create and run process flows for their APEX apps. Have a look yourself what Flows for APEX can do for you!
This section of the site contains a basic workshop showing you how to model a business process with Flows for APEX and then convert it to a working APEX application.
We’re going to build a business process model for a simple business process that approves and pays an expense report. This will show you how:
- model and edit a business process using the Flows. for APEX BPMN Modeler.
- add Flows for APEX components into an APEX application
- configure an APEX Human Task (Approval Task) so that it can be a step in a Flows for APEX workflow
- configure an APEX page (Form) as a step in a workflow
- add a PL/SQL script task into your workflow
- send an email notification from your workflow
Duration: This workshop takes about 60-90 minutes to complete, but afterwards you should be able to model a business process and turn that into a Flows for APEX application.
The Scenario
Here’s the simple process that we will model and build as a workflow application.

Pre-Requirements
This workshop requires Oracle APEX v24.2, Flows for APEX v25.1, and Oracle database 19c.
-
Before starting this tutorial, you should have successfully downloaded the latest version of the Flows for APEX packaged app here and imported it into your APEX workspace. You can find more information about the installation process here
-
To save time, we have created a basic application (Flows for APEX Starter Workshop) that you will enable for Flows for APEX. [Starter File will be linked from here]. You should also download our workshop starter APEX app. Install it into your APEX workspace, including the supporting objects. This installs:
-
EXPENSE_REPORTtable-
PAYMENT_REQUESTtable -
Flows for APEX Starter WorkshopAPEX application, already containing a report and form onEXPENSE_REPORTS -
Approve ExpensesAPEX Human Task definition (we will enhance this)
-
-
First steps with the engine app
Create the business process model
-
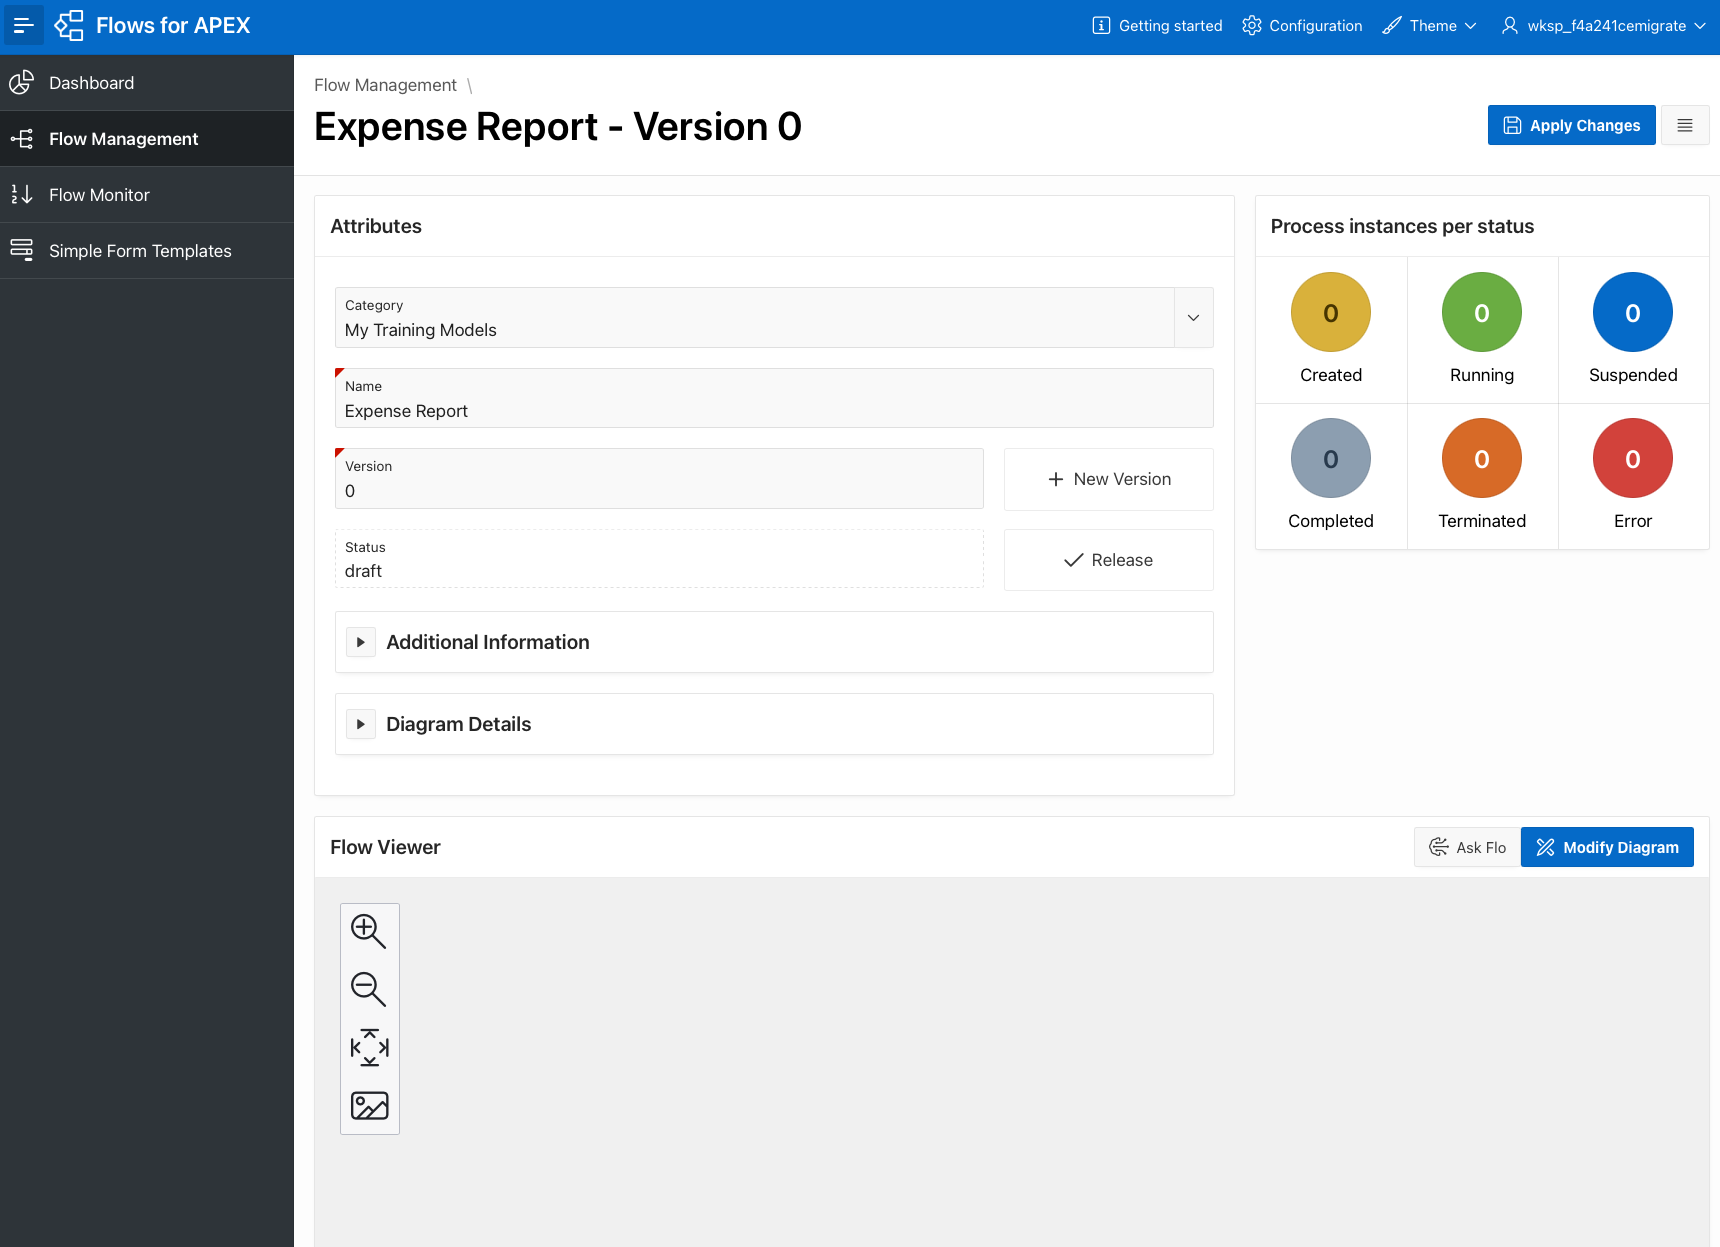
Log in to the Flows for APEX application, open the menu by clicking the hamburger menu at the top left, and go to “Flow Management”. The Flow Management page shows you all of the process definitions or process diagrams that are on the system. When you first install Flows for APEX, this should contain over 25 BPMN tutorial diagrams that you can work through later.
- Click on the Create Model button the top right.
- Complete the form with the following information
- Category: “My Training Models”
- Name: “Expense Report”
- Version: “0”

- Click the Create button.
Edit your first BPMN diagram
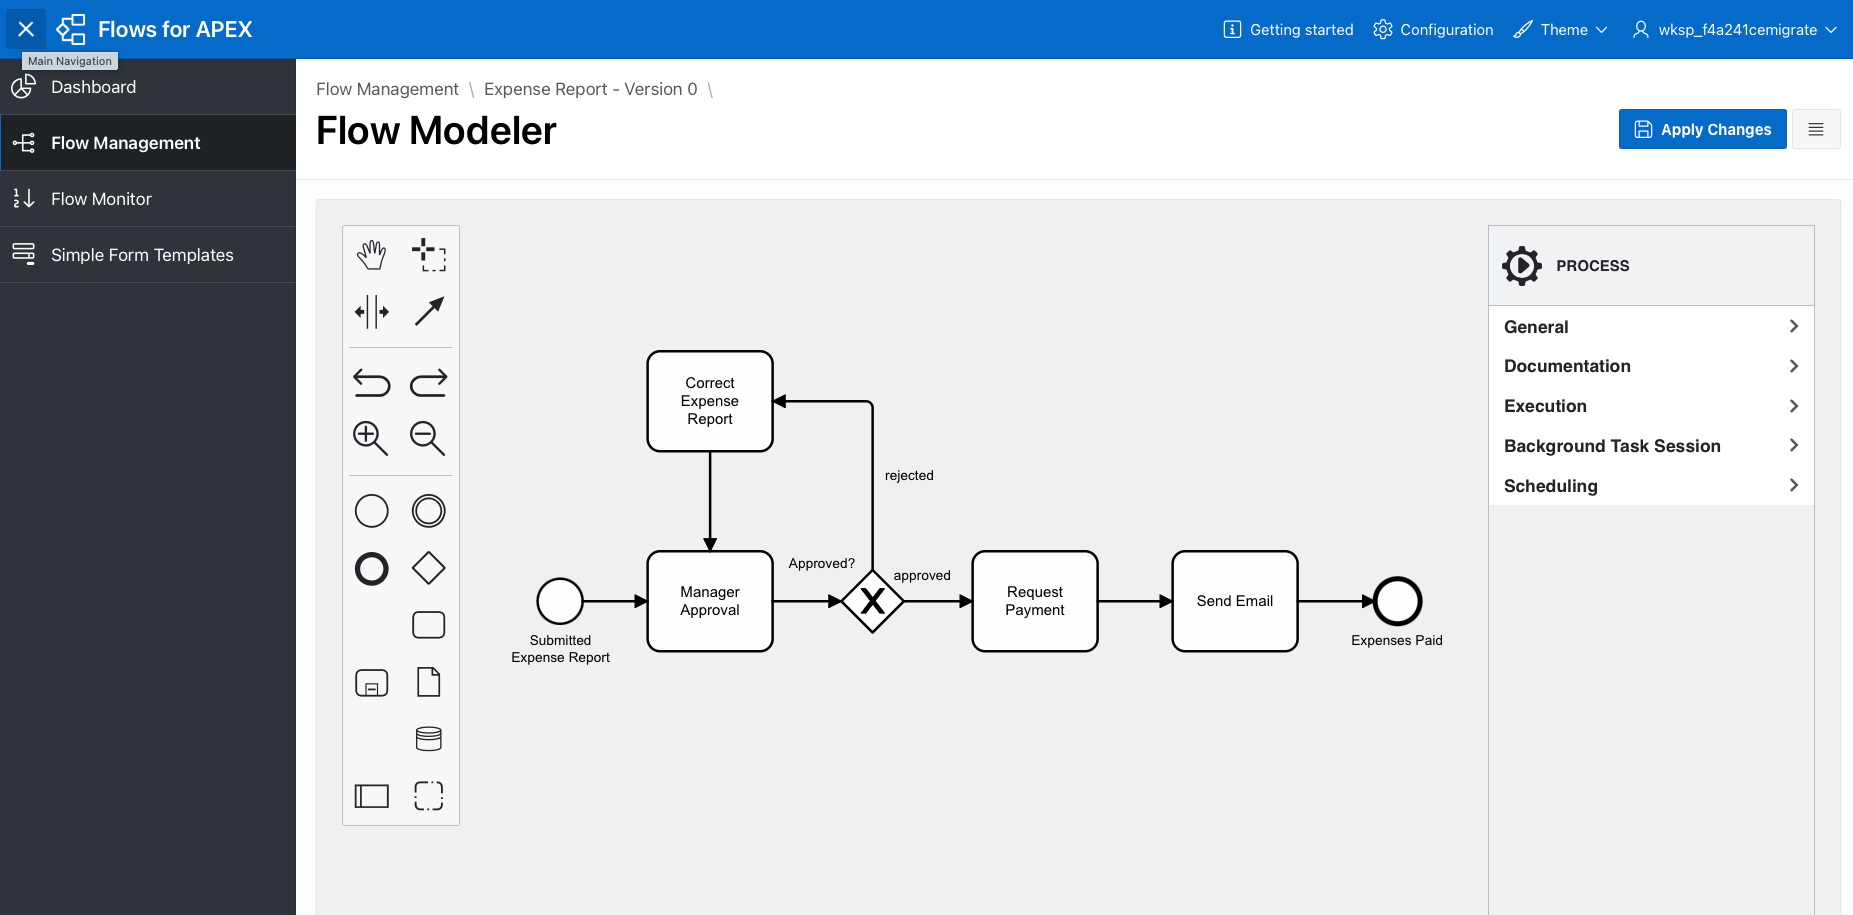
- Click on the Modify Diagram button in the Flow Viewer region header to open the Flow Modeler.
- The Flow Modeler screen will open. This is a graphical BPMN process modeling tool. Note the toolbar on the left hand side, and the properties panel on the right side. On the toolbar, click on the Start Event icon ( ), the thin single circle , drag it into the blank canvas area then double click on the event and type “Submitted Expense Report” in the text area to name our new Start event. This documents our process starting condition.

-
Select the start event and you will see a tool menu open next to it. Click on the task symbol ( ), labeled Append task. Select your new task and name it “Manager Approval”.
-
-
Select the Task, click on the Gateway symbol ( ), labeled Append gateway, then double click on the gateway, name it “Approved?” and drag the name to be above and left of the gateway

-
Select the Gateway, click on the Task symbol ( ), labeled Append task. Name that Request Payment. Then select the gateway again, and append another task. Drag this To above Manager Approval, and rename it Correct Expense Report.
-
Select the link between the gateway and the Request Payment task. This is a BPMN Sequence Flow. Name this approved. Repeat this with the other sEquence Flow from the gateway, naming it rejected.
-
Now add another task after Request Payment, and rename it Send Email. Then append an End Event ( ).
-
We need to add one more Sequence Flow, to close the feedback loop from Correct Expense Report and resubmit it to Manager Approval. Click on Correct Expense Report to select it, select the arrow tool (Connect to another element).
-
We’ve finished laying out a high level model for our Expense Report process. Click on Apply Changes to save the model into Flows for APEX.
This saves the model as a BPMN diagram, an XML document, and also parsed into the objects and connections in the model that will be stored in relational tables that are used to execute the model.
We can now go to the Flow Monitor and test our process flow.
Test Run the Model in the Flow Monitor
When you model and workflow is complete, your users will interact with it through your application. But we can test run it now by creating an instance of the workflow in the Flow Monitor and step it forward there. Note that our process is not fully defined yet, and no application exists yet – but we can still test run it. This is a useful exercise that process designers / business analysts / consultants can do with the business process owners to confirm the business process.
- Open the Flow Monitor
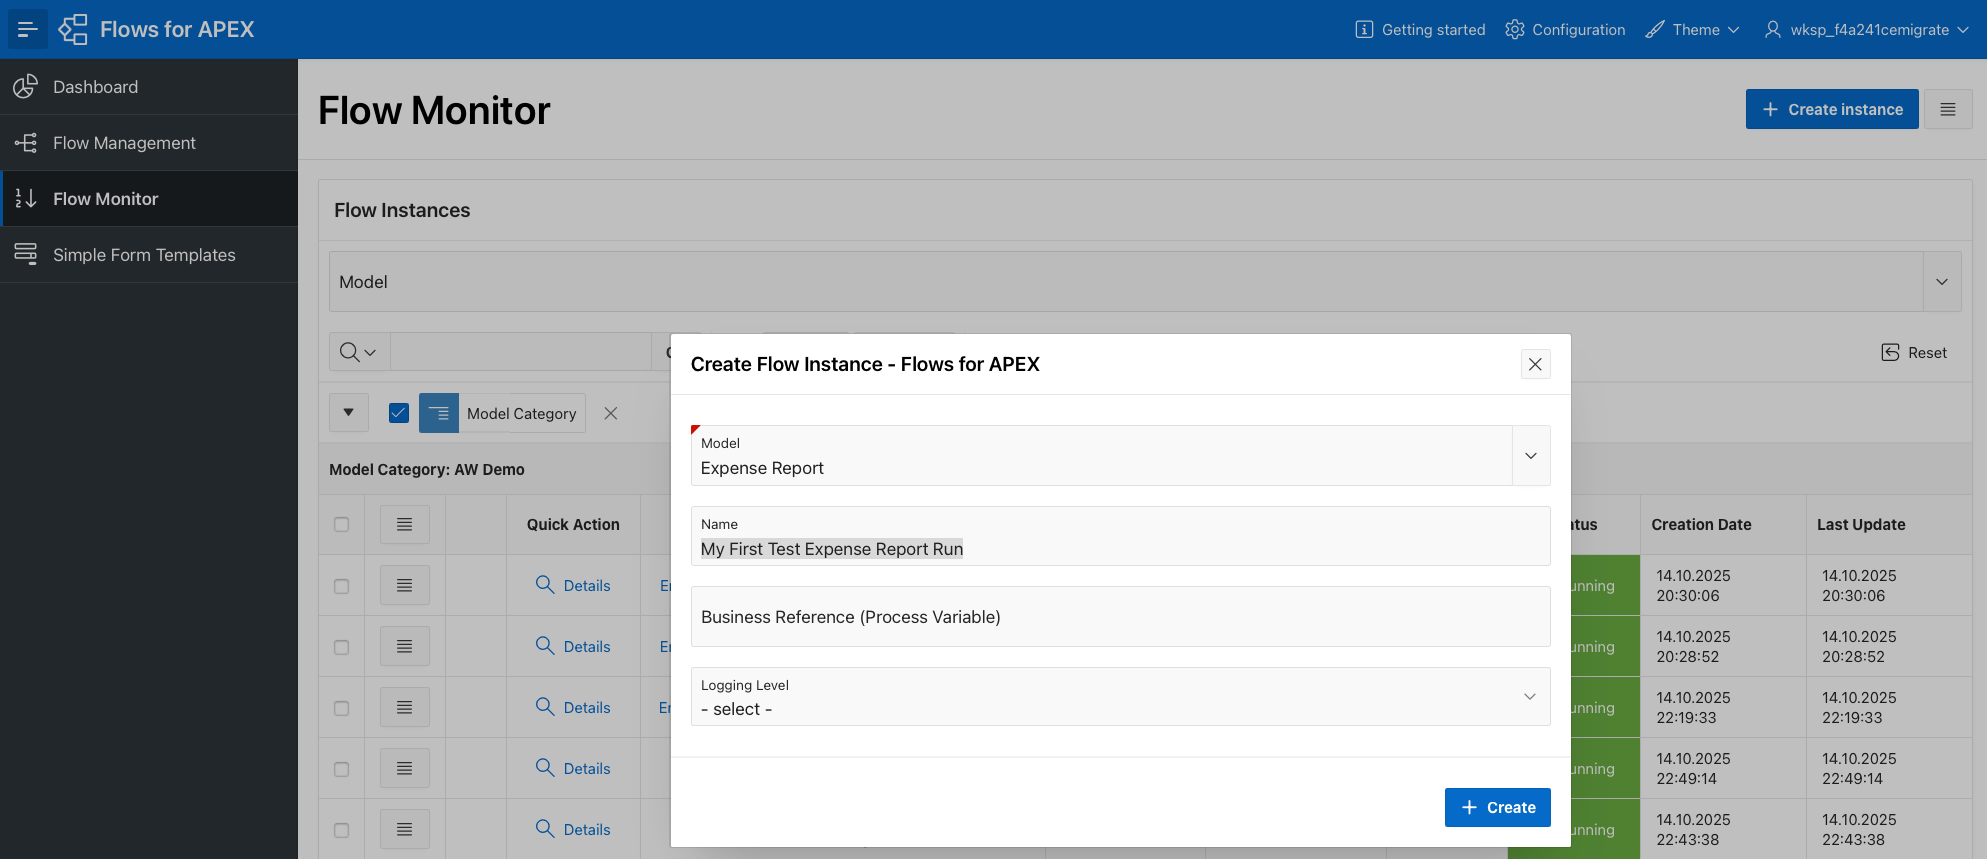
- Using the + Create Instance button at the top right, Create a Flow Instance of our Expense Report model.
- Model: search for and select our Expense Report model
- Name: My First Test Expense Report Run
- Business Reference: You can leave blank now, but this is used to create a process variable named BUSINESS_REF that would contain the primary key of the subject table for this process. For our expense report process, this will eventually contain the expense_id of the expense report we are approving and paying.
- Logging Level: You can leave blank now, but in future this gives you the ability to set a higher logging level for a manually started process run - useful for debugging.
- Click Create to create the process instance.
We now have a process instance of our Expense Report process that has been created but not yet started.
- Find your new instance by searching by the model (Expense Report)
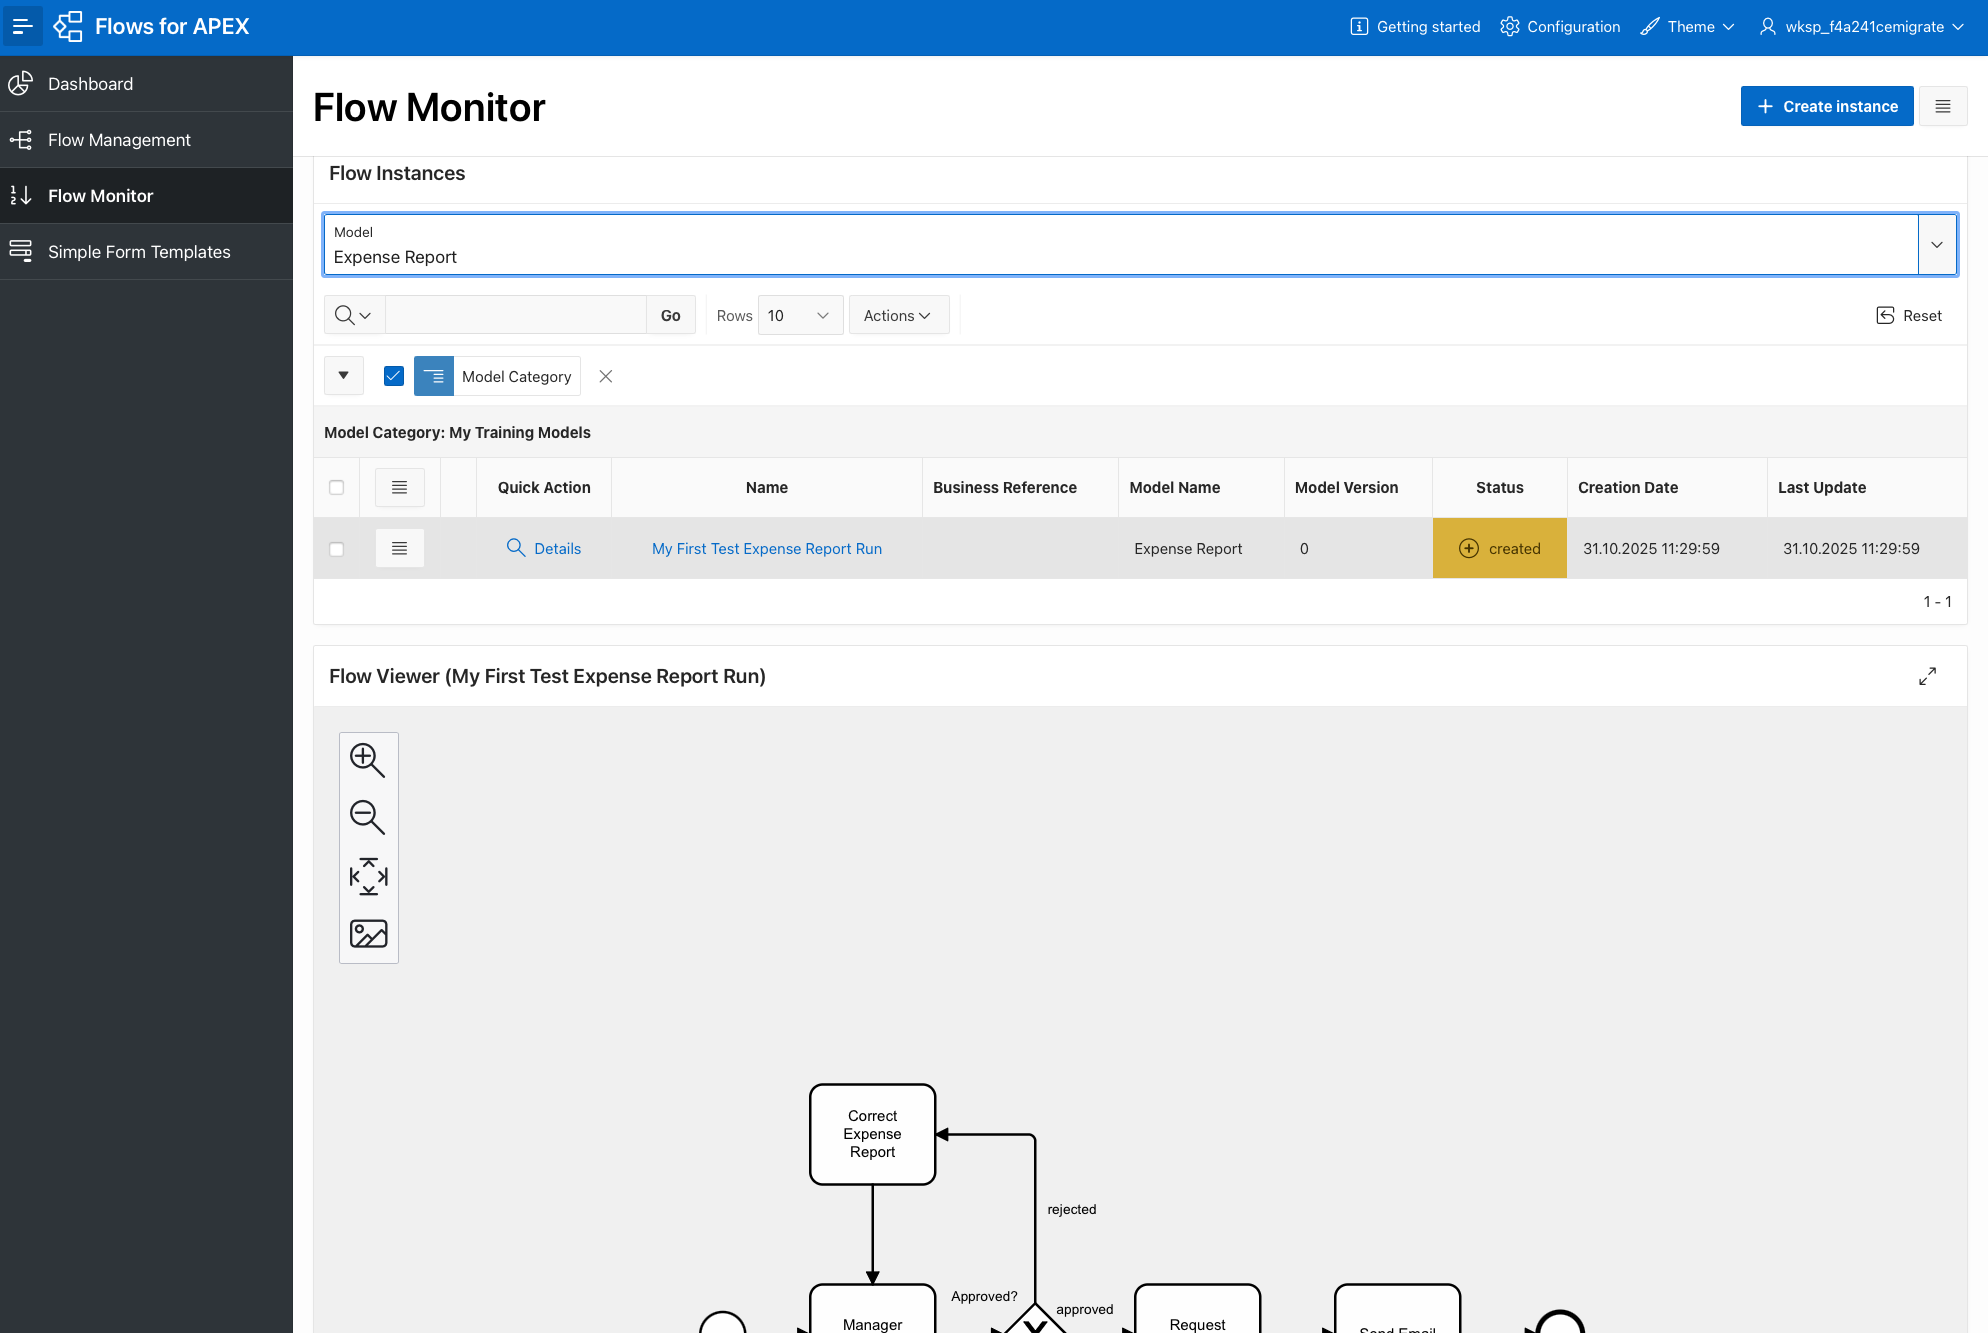
- Click on Details to open the Instance Details page for our process instance.
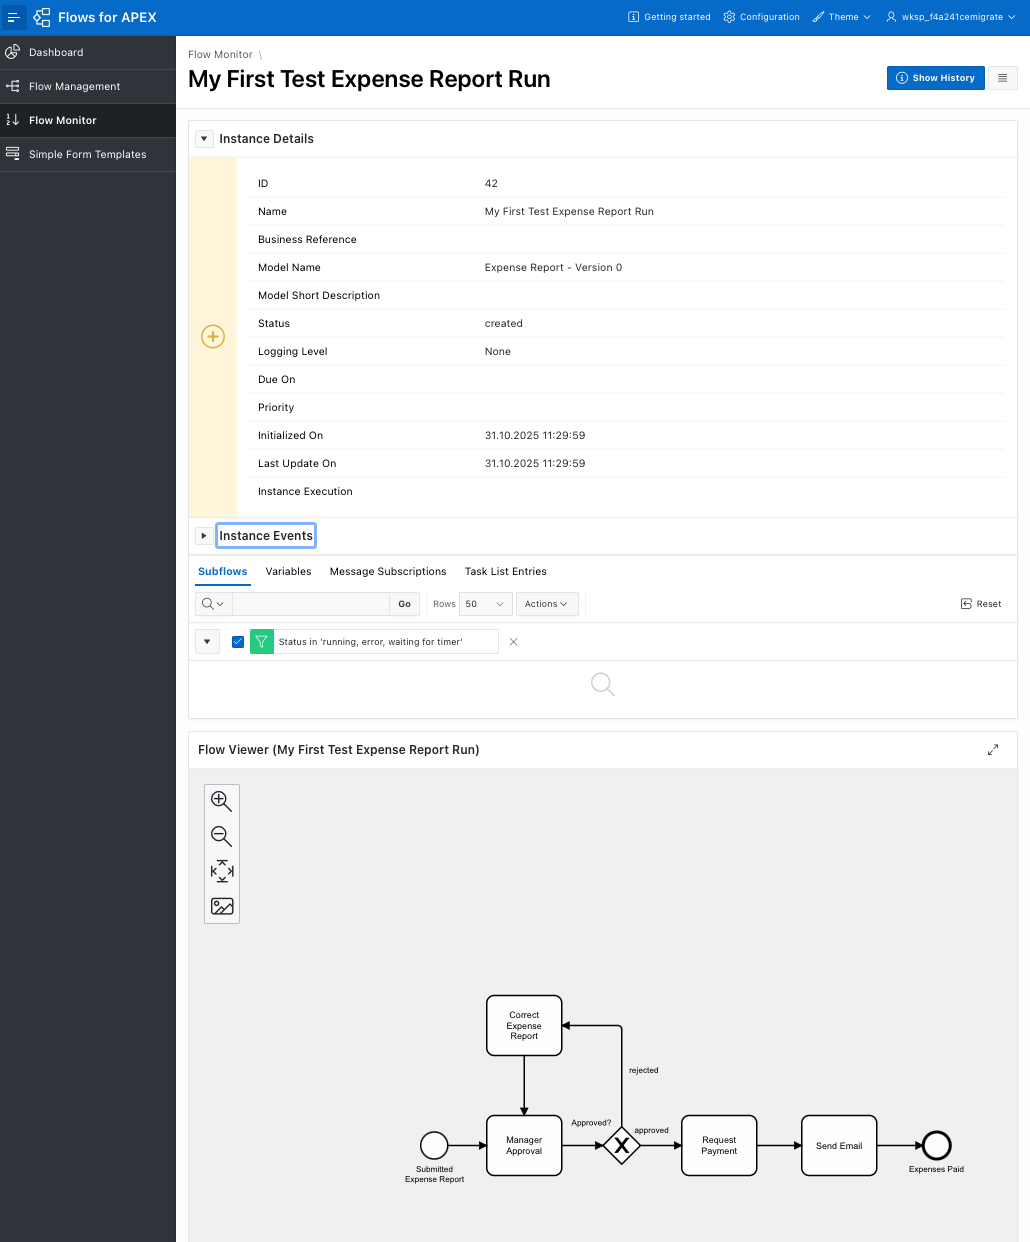
- Start the process instance. Using the hamburger menu in the top right, select Start.

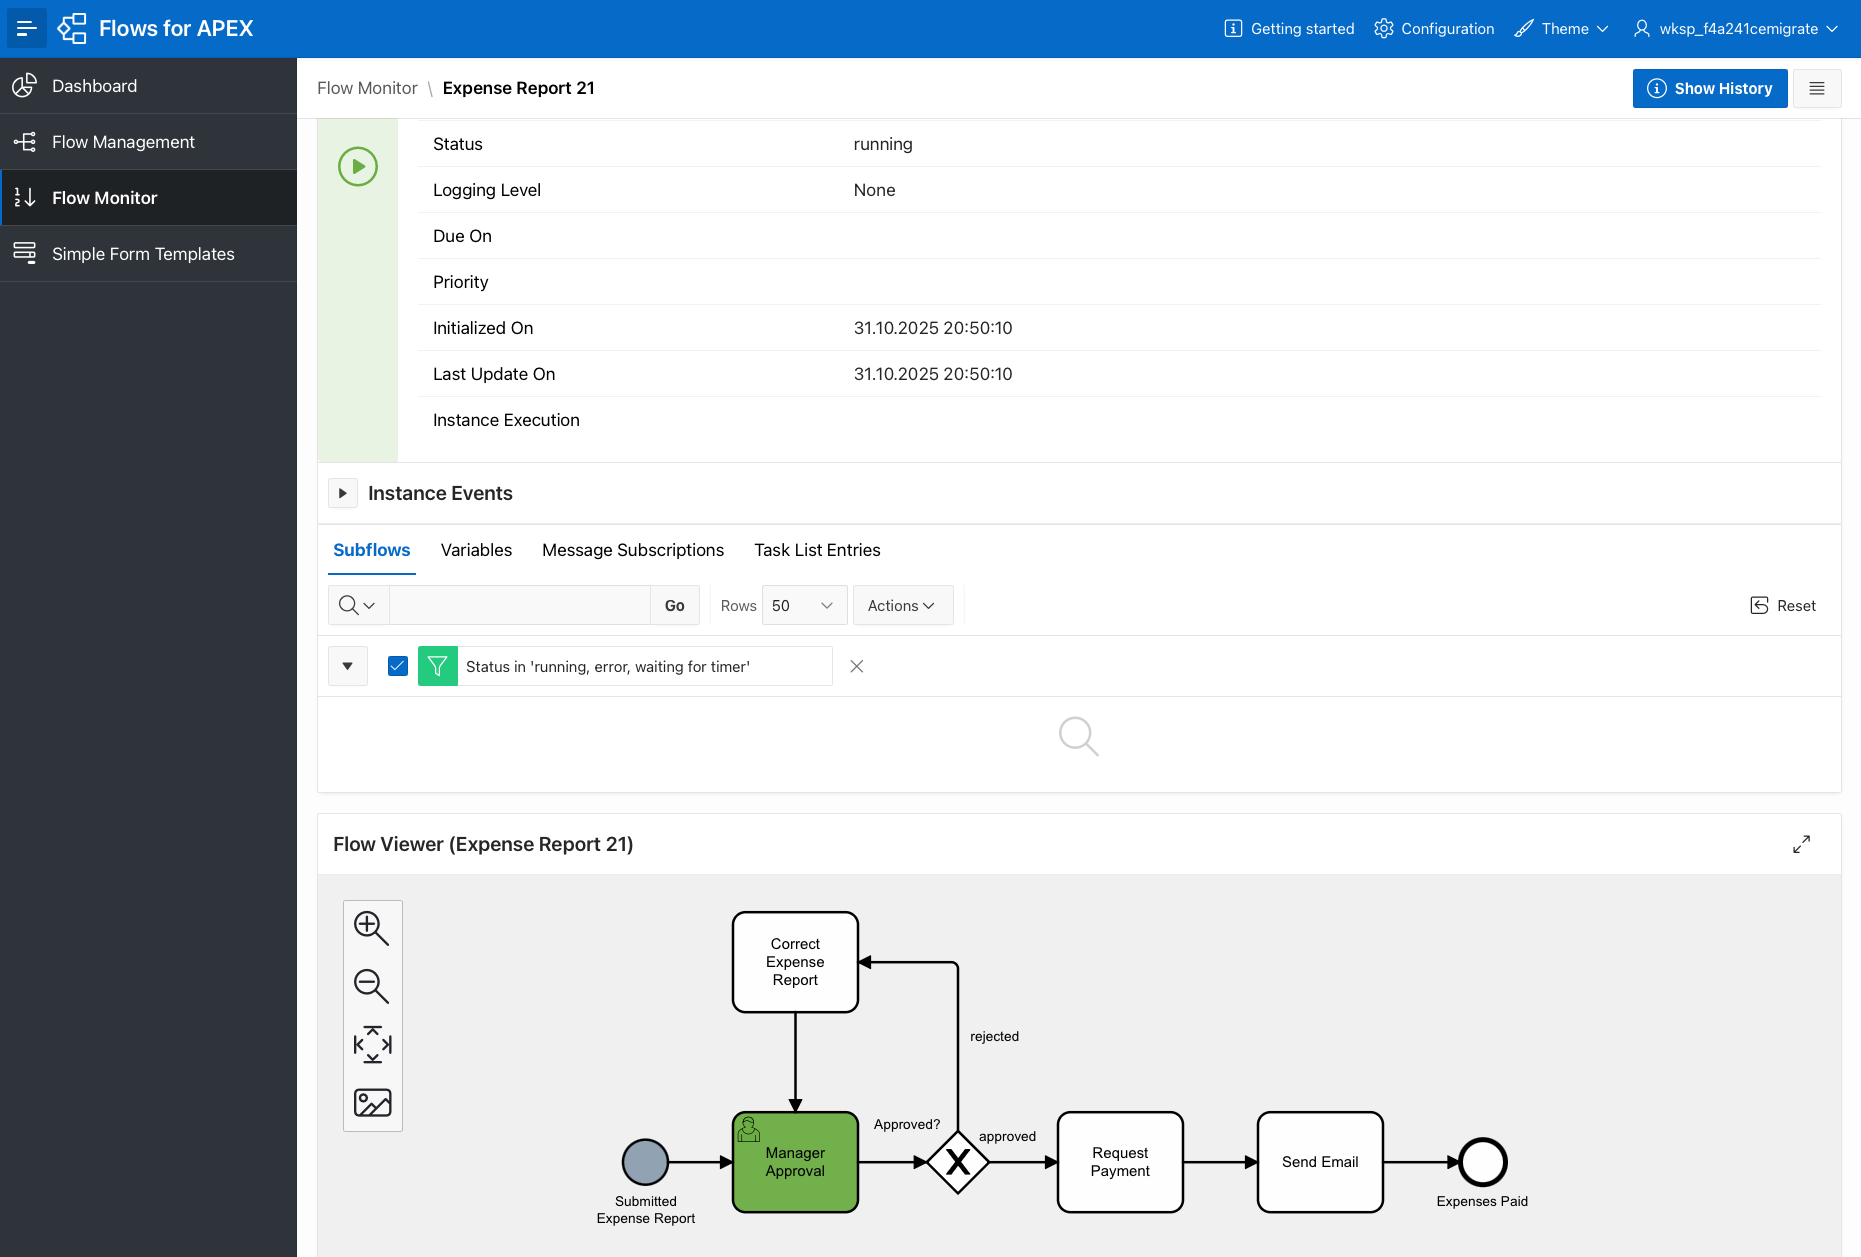
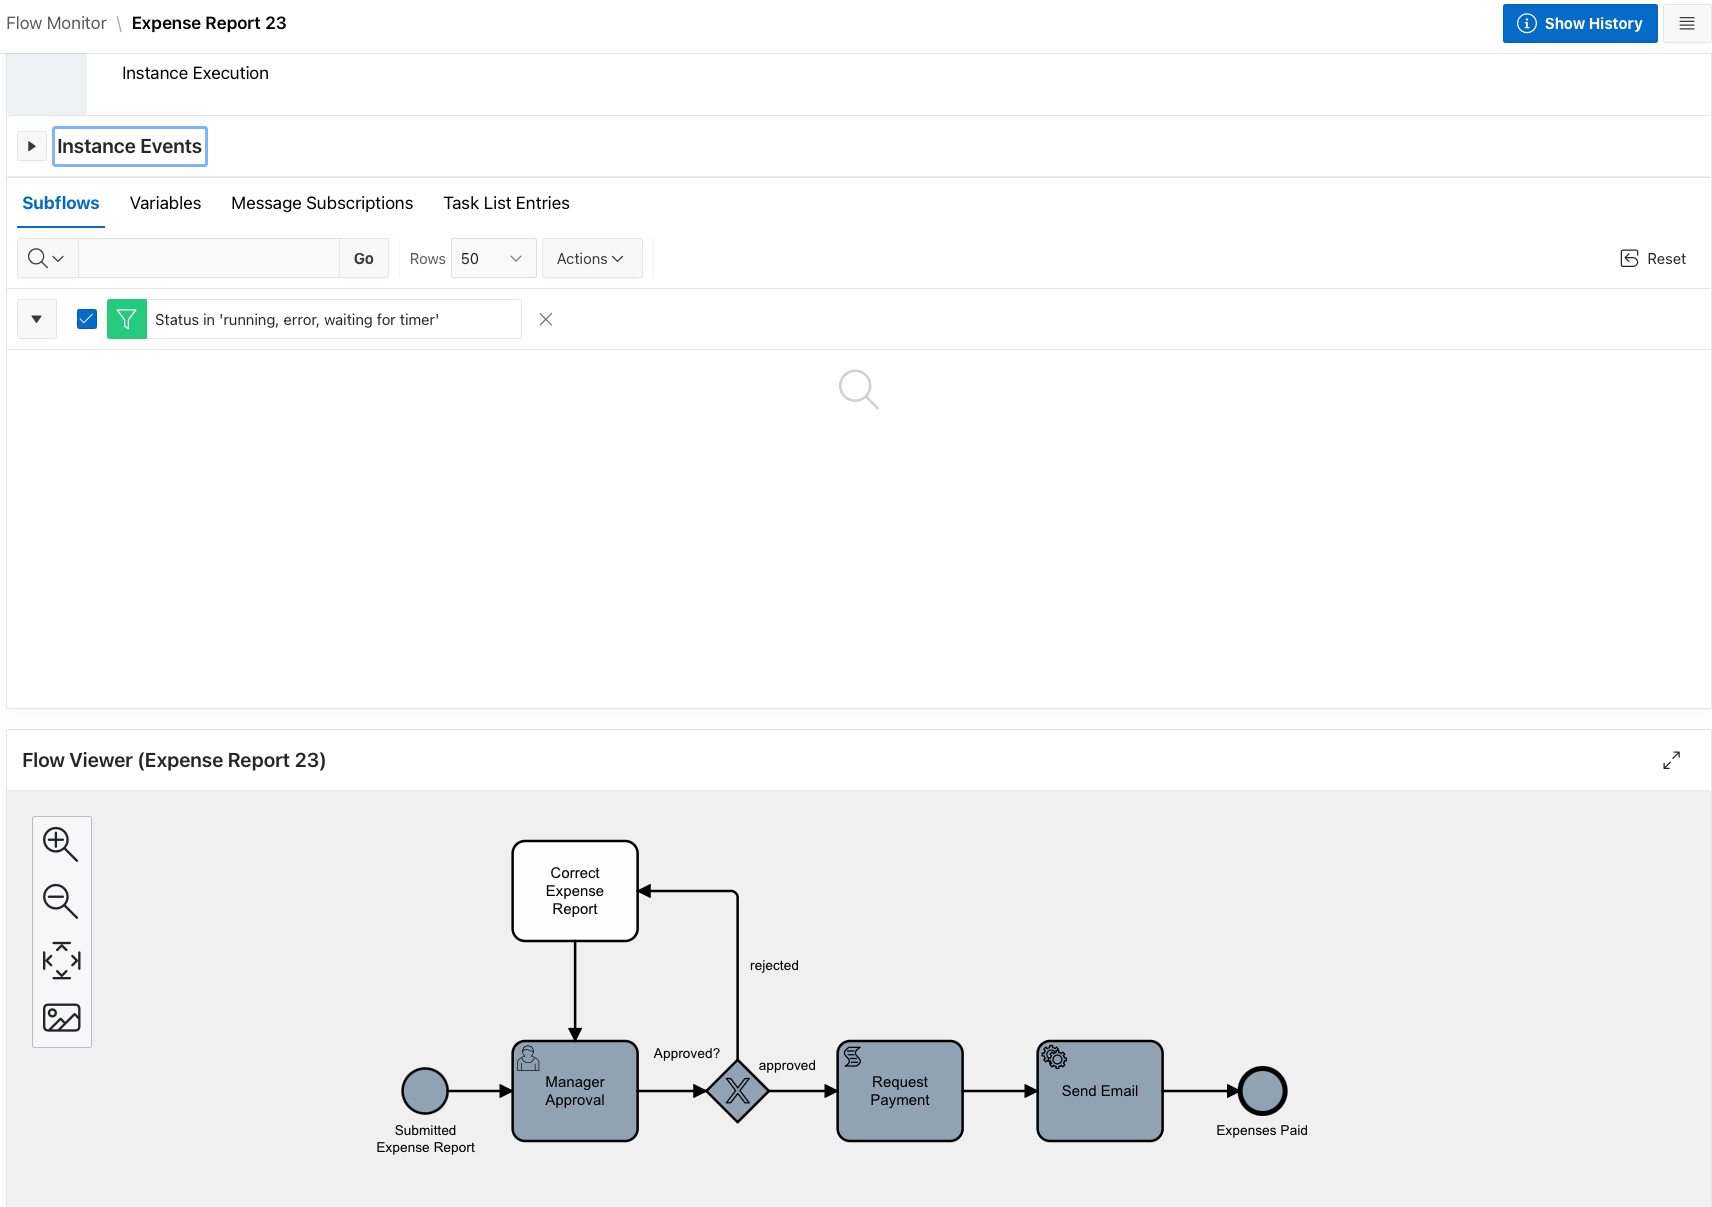
- You can see that now the workflow instance has started, it now has one subflow that is running, and the current step on the workflow is our Manager Approval task.
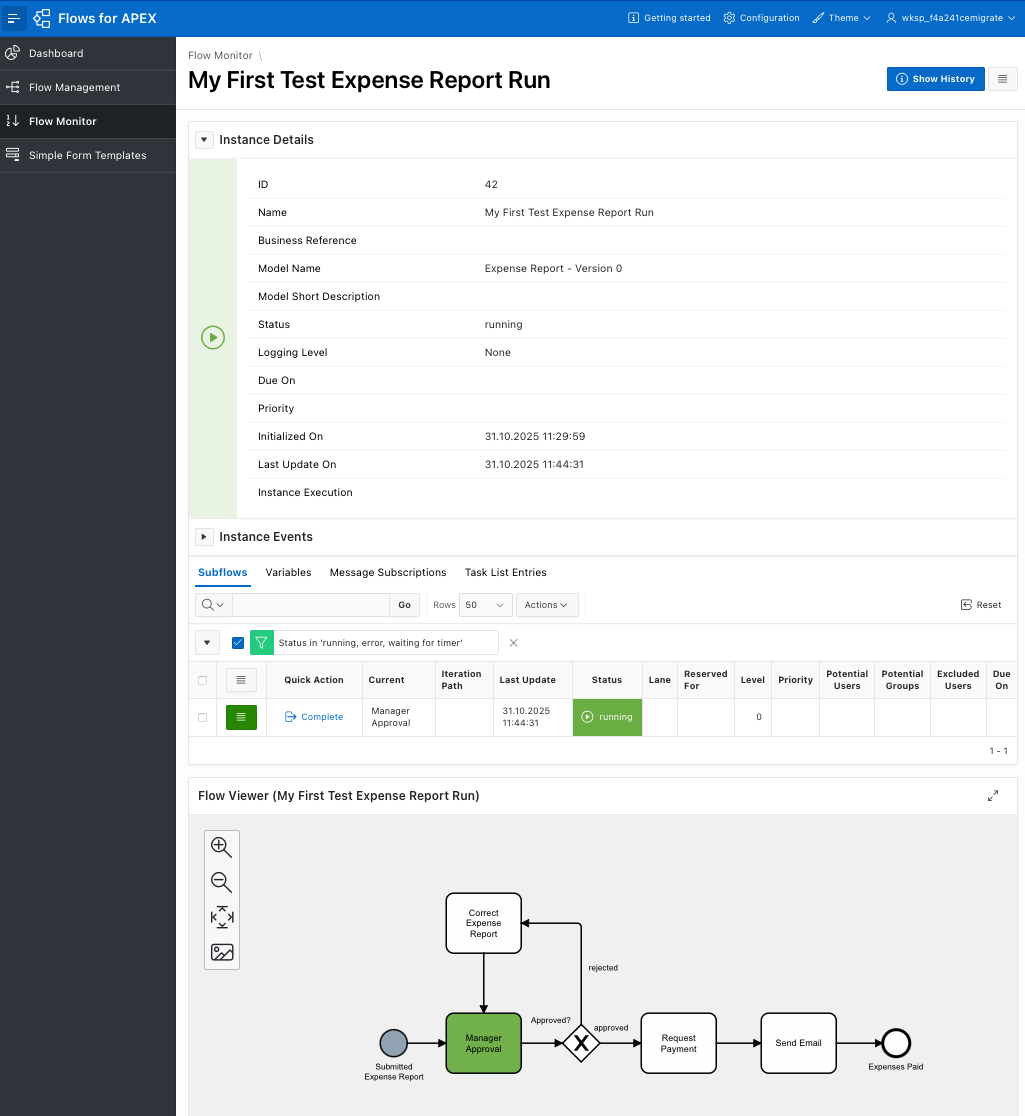
- Click Complete to step the workflow forward… we get an error cause our (not yet complete) model hasn’t told the gateway which path we want to take…
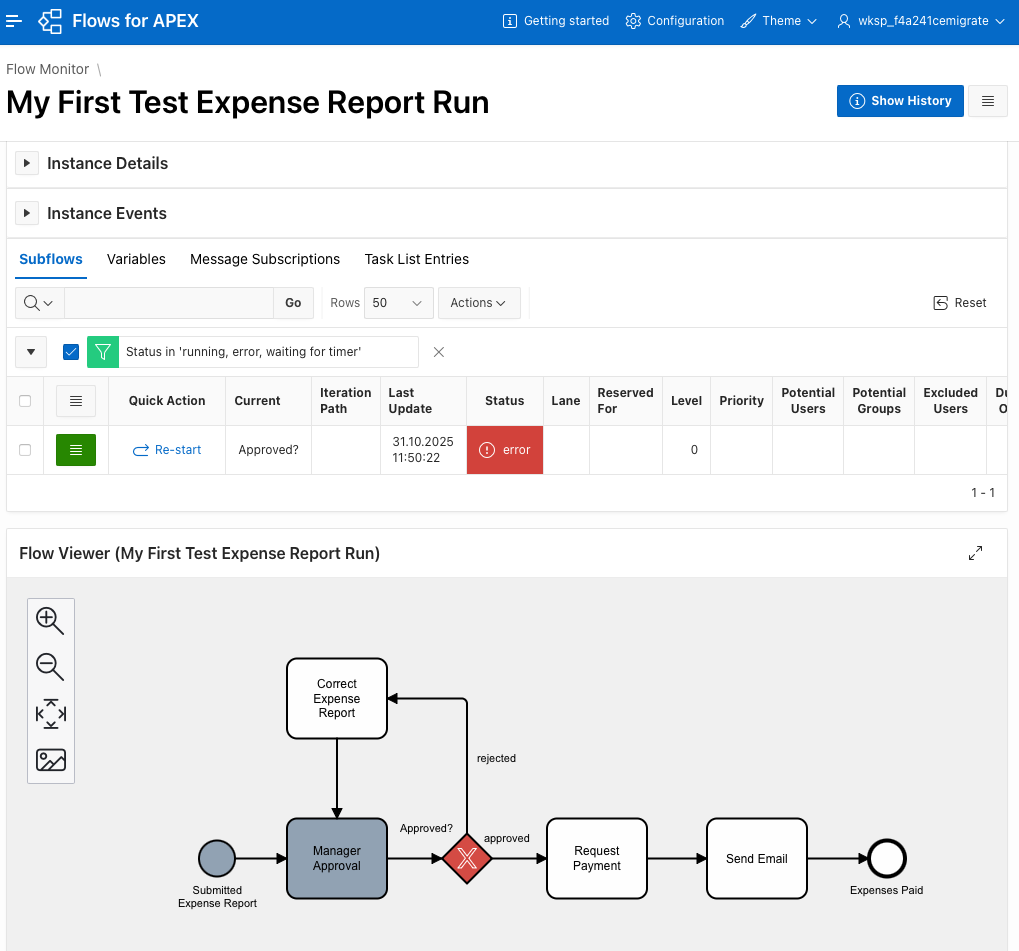
- In the Flow Monitor, we can set gateway routing and then restart an errored process step. Open the Variables tab, select Set Gateway Routing, and set it to go on the approved path. Then select the Subflows tab, and re-start the subflow.
- You can step the process forward until it completes. If you want to experiment further, you can reset the instance from the instance action menu (top right), which returns it to it’s created status, deleting all process variables except business_ref. Test routing via the rejected route.
You can now see how to test run a process instance - even though we have very little detail added to the process and we don’t have an application for it. This is a useful exercise that process designers / business analysts / consultants can do with the business process owners to confirm the business process.
Prepare our Application for Flows for APEX - Add Components
Your application needs some plugins so that you can start process instances, step them forward, set process variables, and use APEX Human Tasks without having to add PL/SQL code into the app. Using APEX Component Groups, new in APEX v24.1, it’s now very easy to add everything you need into your app in one simple action.
- In the APEX Application Builder, open the Flows for APEX Starter Workshop app that you downloaded and installed earlier.
- Go to Shared Components » Component Groups. Select Copy from another app in the Tasks section in the right hand panel.
- Copy the Flows for APEX Components from the Flows for APEX app.
You now have all of the plugins that you need. We’ve also created three application items that will be used to hold the process_ID, subflow_ID, and step_key when a step starts. These three parameters always need to be returned when a step completes.
Prepare your Application - Create and Configure an APEX Task List.
As part of the APEX Workflow and APEX Human Task functionality, APEX can generate a page containing all of the required functionality for a unified Task List, containing all of the current tasks that a user is the actual or potential owner of. To use this for Flows for APEX tasks as well as APEX Tasks, we need to do a little configuration so that the Flows for APEX tasks are shown and have appropriate buttons.
For this workshop, we have done this for you - the Task List page in the Flows for APEX Starter Workshop app already contains a configured Task List page. But so you know how to set this up on your next application project, all you need to do is follow the instructions in our documentation how-to page on the APEX Task List.
That was easy!
Starting a Process Instance from your App
If yu take a look at the starter app, Flows for APEX Starter Workshop, you can see that there is a page 2 containing an APEX interactive report on Expense Reports. The report has a Create button, which opens page 3, a form named Expense Report that allows you to create an expense report. These are just default report and form pages generated by APEX.
We want to modify the form so that when it creates an expense report, it also creates our expense report workflow. If you look at the process diagram, you’ll see that the starting condition, used to name the Start Event, is Submitted Expense Report. So our process needs to start when the expense report is submitted. (To avoid your later confusion, note that the process does not include creating the expense report. Our Create Expense Report form starts the process but is not a task in the workflow. This distinction may seem pedantic, but being clear what is the starting event, and what is in or out of the workflow, will avoid pain later!)
So as part of saving the expense report, we need to create and start an instance of the Expense Report process.
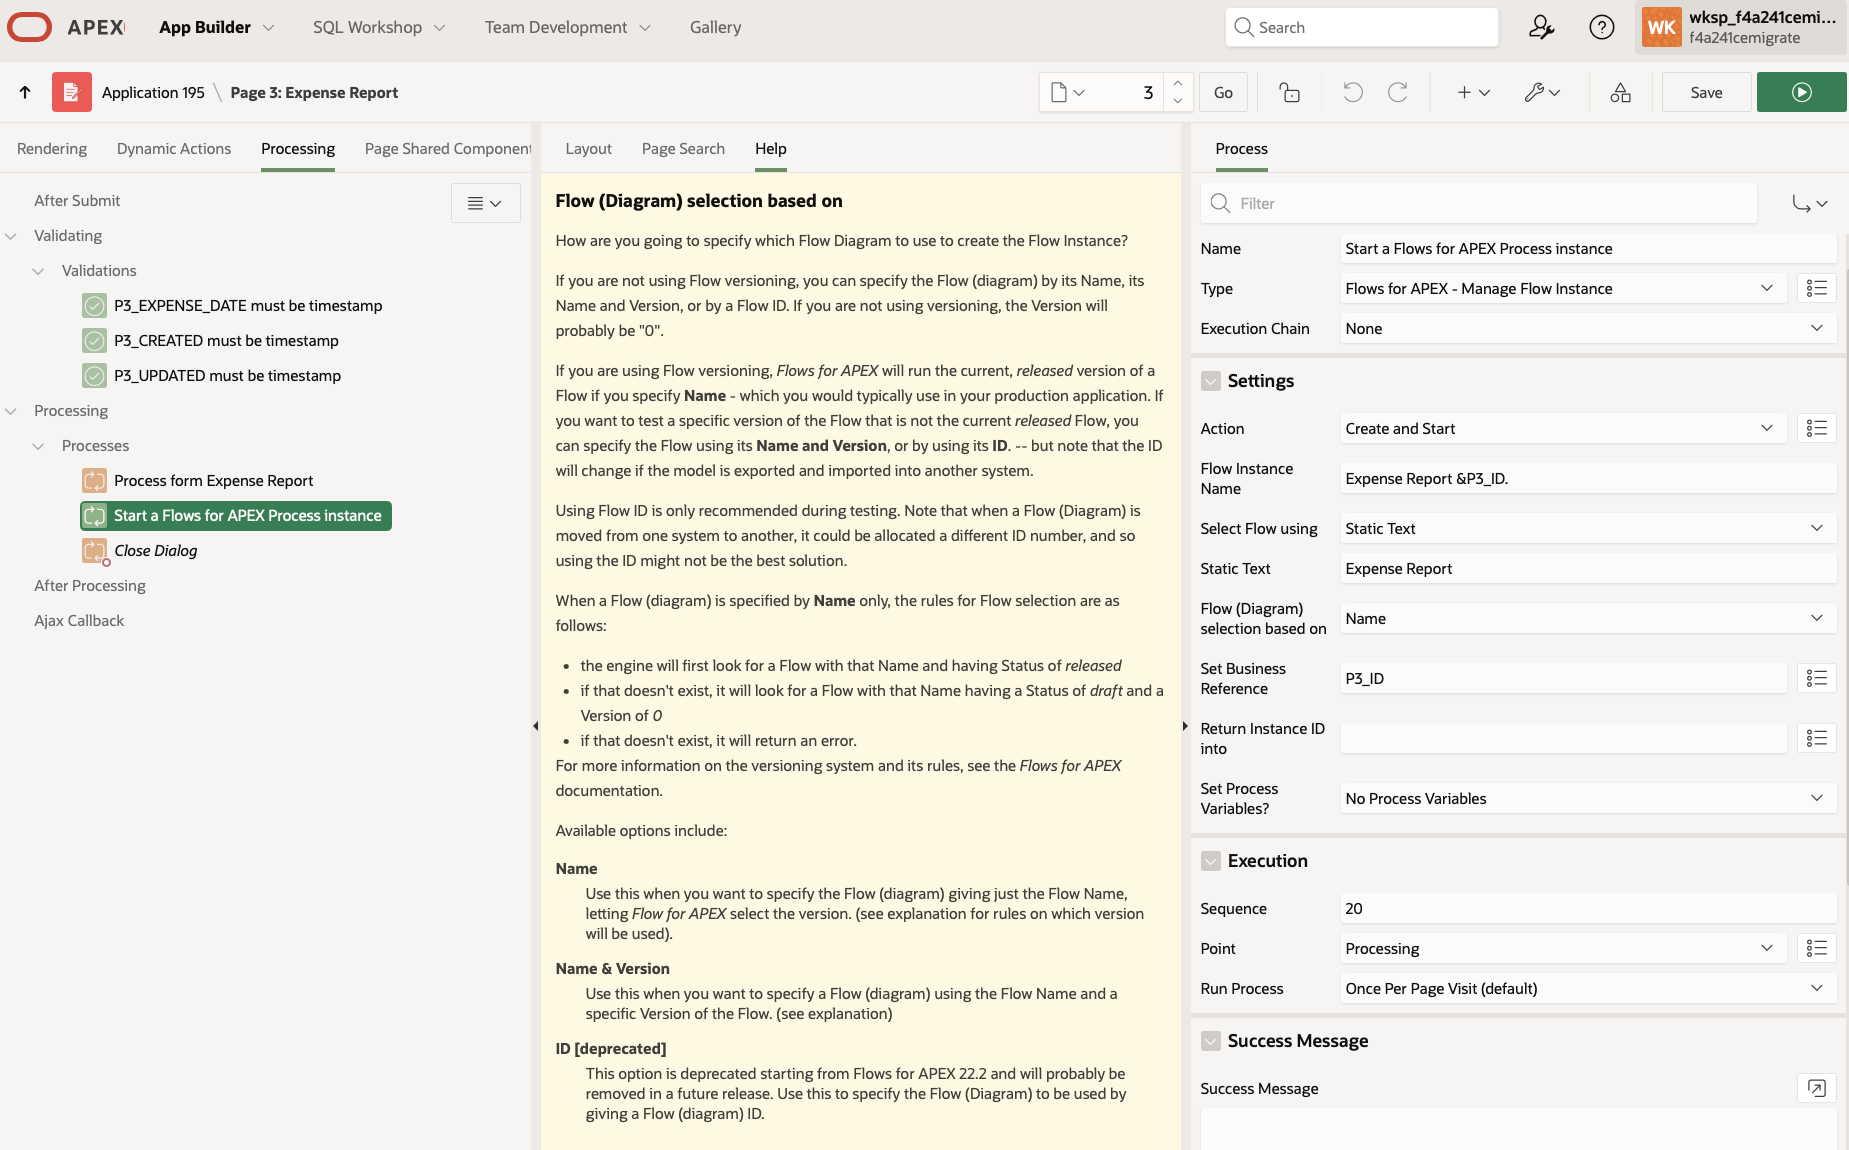
- In the APEX Application Builder, open page 3, Expense Report.
- In the left panel, select the Processing tab. This currently contains 2 processes, Process form Expense Report and Close Dialog.
- Right Click on Processing » Processes to get the action menu. Select Create Process to create a new process, and then drag the New process so that it is after the Process form Expense Report process. We always want the Flows for APEX process to occur after the database DML process.
- With our new process, configure as follows.
- Name: Start a Flows for APEX Process Instance
- Type: Flows for APEX - Manage Flow Instance
- Settings: Action: Create and Start
- Flow Instance Name: This is the name of the instance, not the diagram name. Expense Approval &P3_ID.
- Select Flow (diagram) using: Static Text
- Static Text: Expense Report
- Flow (Diagram) selection based on: name
- Set Business Reference: P3_ID
- We don’t need to return the Instance ID or set process variables here.
- Save the page.
This will now start a workflow process when a new expense report is saved.
Further Refine our Model - Configure the Approval and Gateway Routing.
We’re going to get the Manager Approval and approved? gateway working first. This is going to implemented in our application using an APEX Human Task (APEX Approval Task).
Go back to the Flows for APEX app, select the Flow Management tab, and find our Expense Report process. Click on the process name to open the model details page. Click on Modify Diagram to re-open the diagram in the Flow Modeler.
- Select the Manager Approval task. Using the spanner / wrench tool ( ), convert out generic task to a User task.
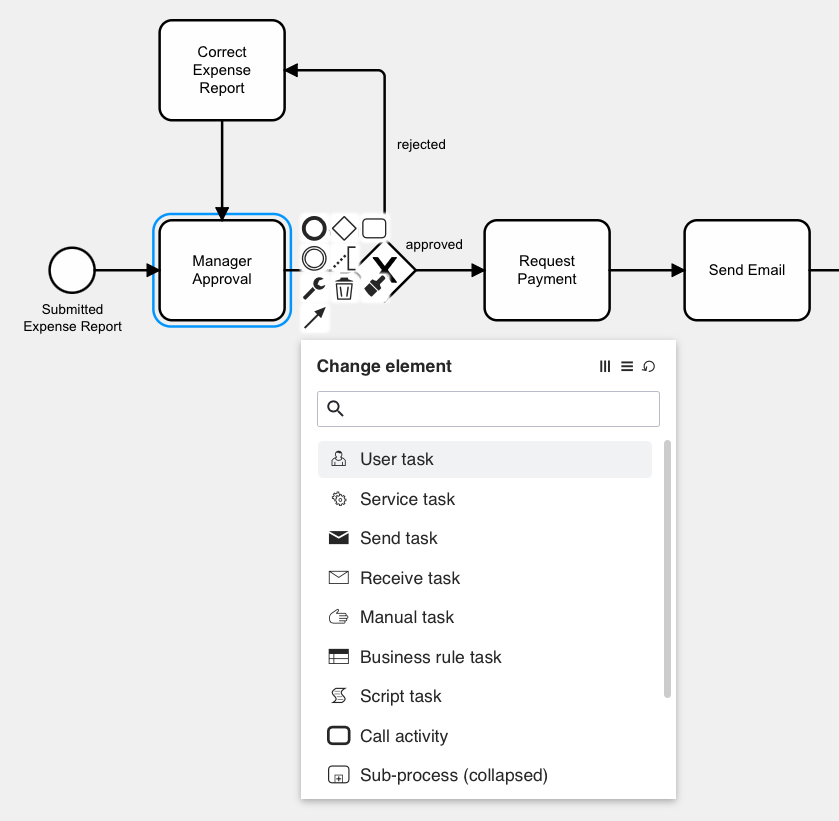
Notice that the Properties Panel for the task now has many more configuration options.
- In the Properties Panel, open up the Task Type region, and select APEX Human Task.
- Open the APEX Human Task region:
- Turn on Use APEX Meta Data.
- Application: Select the Flows for APEX Starter Workshop.
- Task Definition: Select Approve Expense
- Subject: leave blank - we don’t want to over-ride the subject already defined in the task definition.
- Business Reference: Click on the blue link named business ref underneath the item. This will load the value
&F4A$BUSINESS_REF.into the item. (Note: Flows for APEX process variables can be substituted using APEX&name.syntax – but we always prefix the variable name with (upper case)F4A$to prevent APEX item names and Flows for APEX variable names getting confused.) - Parameters. The APEX Human Task requires some task parameters to be set. If you click on the green Load Parameters link, we will pre-populate a parameter for each expected parameter. And we’ll set the value for
process_id,subflow_id, andstep_keyfor you as well. - Outcome Variable. The Flows for APEX process variable name to return the Approval Outcome into. We’ll set that to
APPROVAL_OUTCOME - Initiator - leave blank
- Initiator Can Complete. In this workshop, we’ll do everything as one user - so turn this on.
- Now we’re going to configure the Gateway routing to use the Outcome from our Approval Task. Select not the gateway but the link between the Approved? gateway and the Request Payment Task - the approved sequence flow. In the properties panel, open the condition region, then:
- Sequence: 10
- Condition Type: Expression (for a PL/SQL condition)
- Condition:
:F4A$approval_outcome = 'APPROVED'
- Select the rejected sequence flow, and apply the opposite expression.
- Sequence: 20
- Condition Type: Expression
- Condition
:F4A$approval_outcome = 'REJECTED'
- Apply Changes to save our updated process diagram.
We should now be able to test the first bit of our workflow. We should be able to start a process instance, create an approval task for the manager, and move the workflow forwards on the approved path. Let’s give it a try…
Test our workflow start
From the APEX Application builder, Run the Flows for APEX Starter Workshop app.
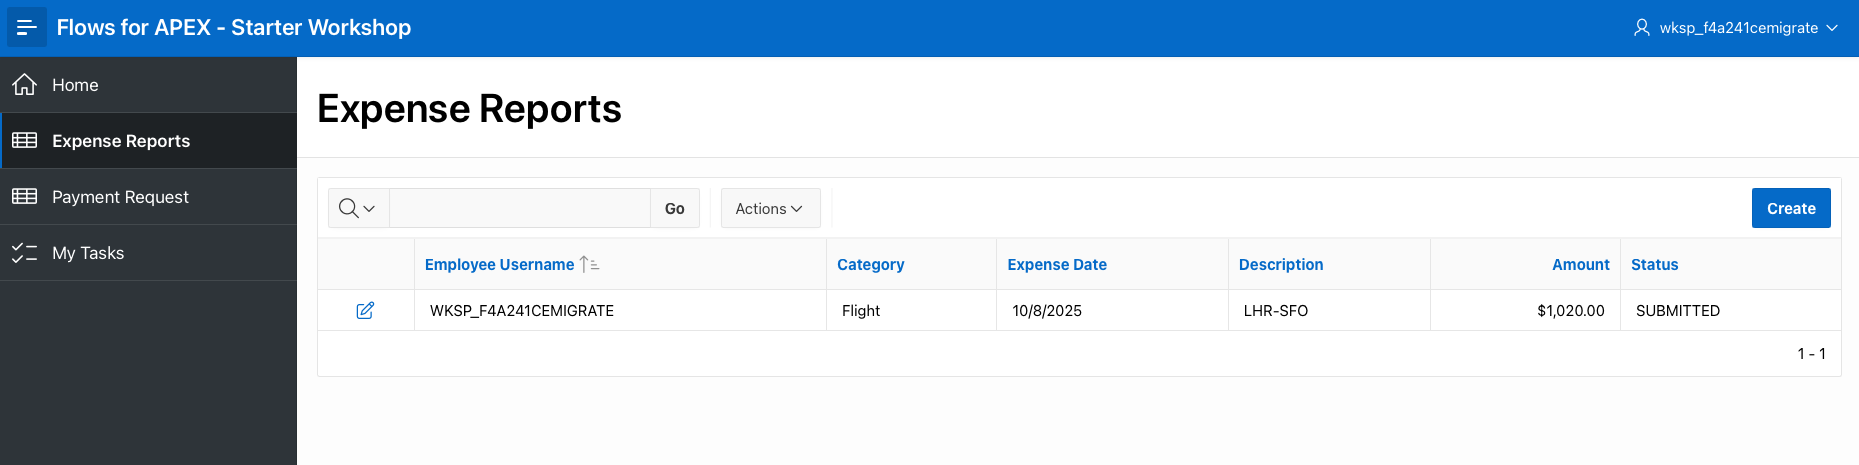
- Click on the Expense Reports menu item to open the Expense Reports interactive report. (P2).
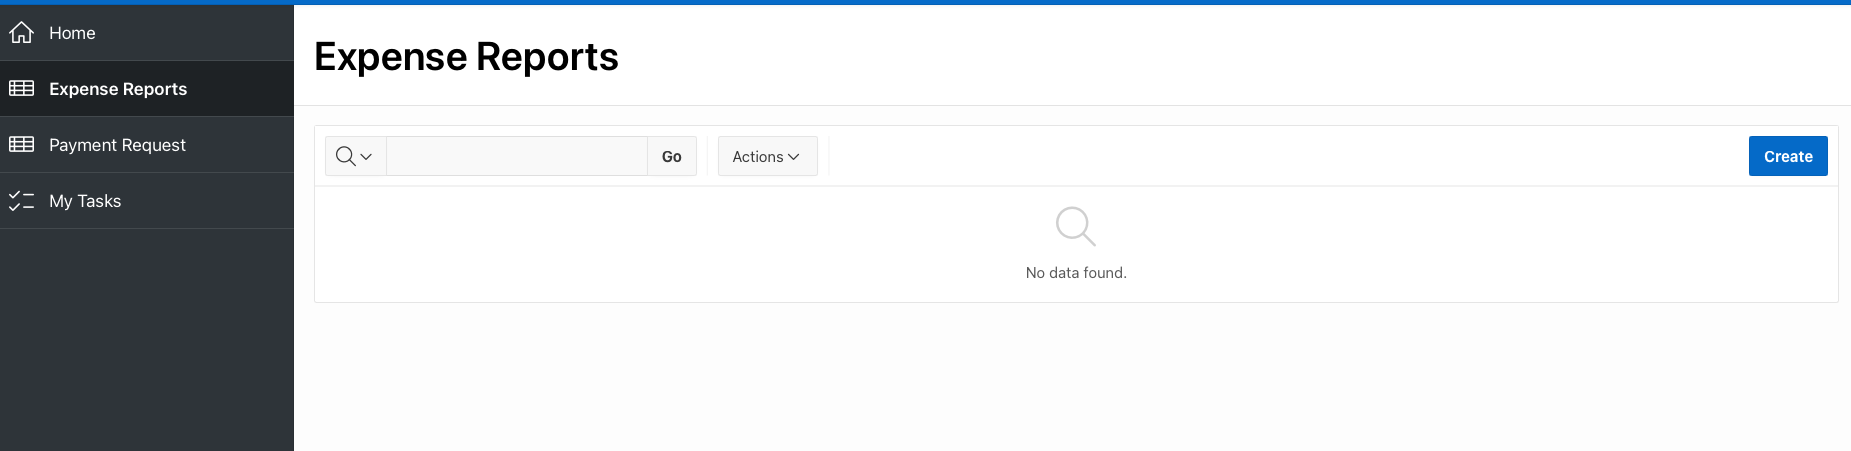
- Click on the Create button
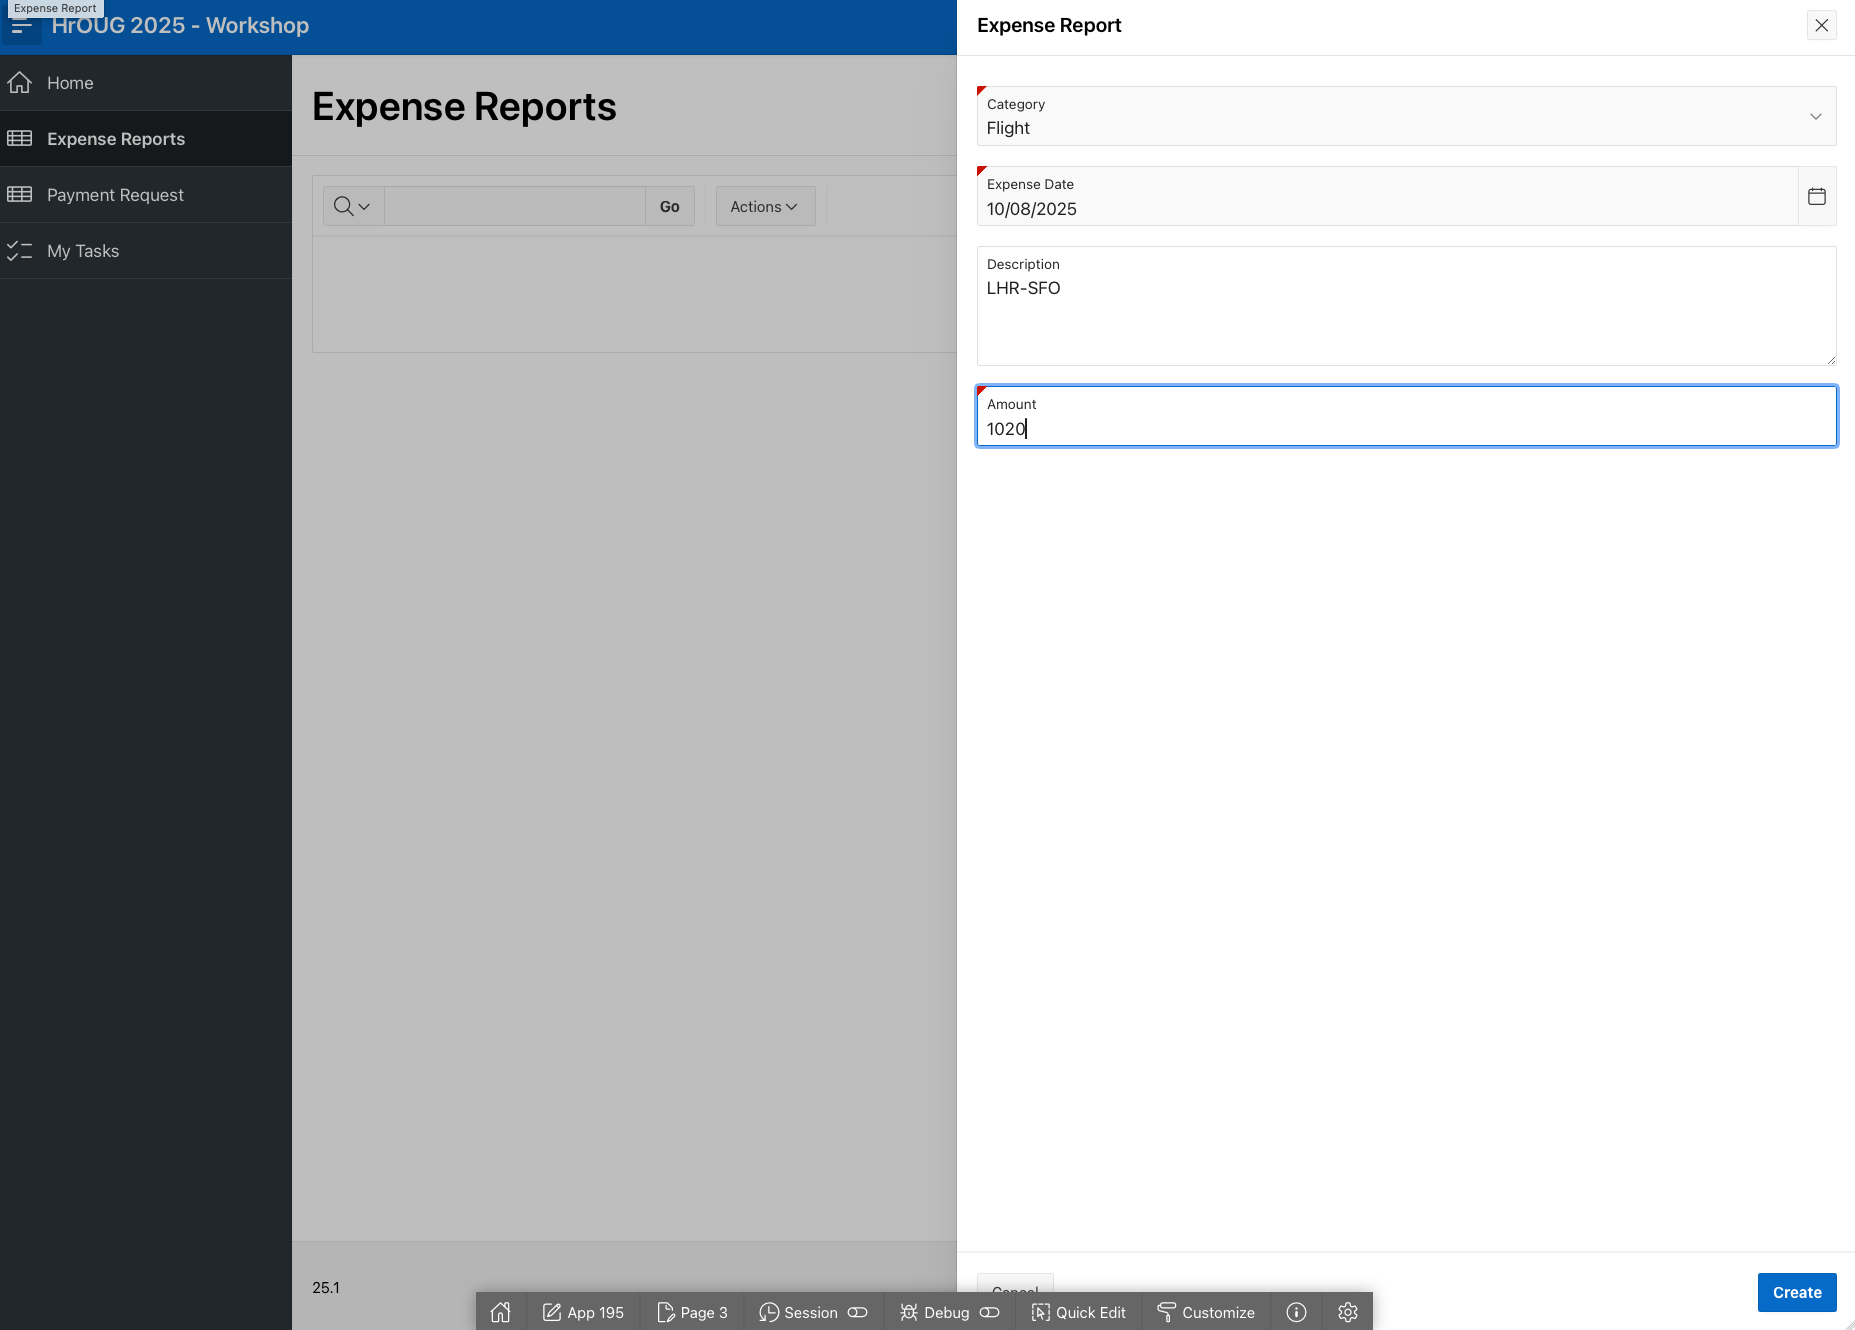
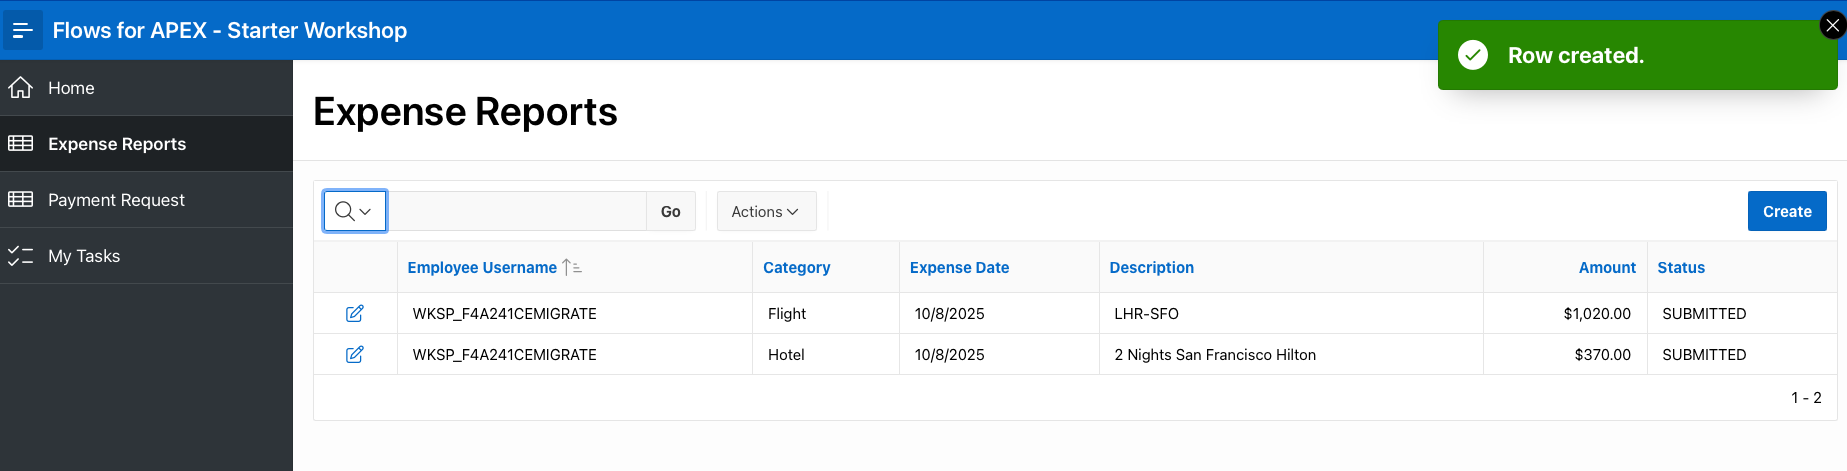
- Create the expense report. Our expense report was created.
- In the left menu, select My Tasks. You can see the Approval Task in the APEX Task List.

-
Click on approve to approve the expense report.
-
Let’s now look at the Flow Monitor. We are expecting the workflow will now have used the approval outcome to set a Flows for APEX process variable, approval_outcome to APPROVED, and for the gateway to have used this to move the process forward to the Request Payment step.
After finding our process instance and opening it, we can se that the process is running – but it’s still on the Manager Approval step.
That’s not what we were expecting. Let’s look at the process variables in the Variables tab. You can see that the BUSINESS_REF is set, but our APPROVAL_OUTCOME doesn’t exist. We didn’t do anything in our APEX Human Task to return the outcome to Flows for APEX. Let’s go and fix that…
- Open our Flows for APEX - Starter Workshop app in the APEX app builder. Go to Shared Components and then TTask Definitions. Open the Approve Expenses approval task.
Inspect the task definition. Note that:
- We set a task subject using some substitution parameters. All good.
- The Actions Table Primary Key is the EXPENSE_REPORT.ID . That’s consistent with our business_ref in Flows for APEX. All good.
- The Potential Owner is set to the APP_USER. That’s unusual in a real application, but OK for this workshop. (see APEX Human Task doc for how to configure this when you build a real app!).
- Task Parameters are set to process_id, subflow_id, and step_key – as they should be. All good.
- Actions. There aren’t any task actions defined! So our approval task doesn’t yet do anything when it completes. Here’s our problem. We need to add a task action for task completion, and we should also add actions for cancellation, expiry (if our Human Task has expiration rules - which it doesn’t).
- Click on Add Action
- Name: Return Outcome to Flows for APEX on completion
- Type: Flows for APEX - Return APEX Human Task State and Outcome [Plug-in]
- On Event: Complete
- Outcome: Don’t select either option. But if you do, you will need to create another task action for the other outcome.
- Note the Action Settings have automatically appeared, naming the task parameters containing process_id, subflow_id, and step_key. All good,
- Click Create
- Click on Add Action
- Name: Return state to Flows for APEX on cancel
- Type: Flows for APEX - Return APEX Human Task State and Outcome [Plug-in]
- On Event: Cancel
- Note the Action Settings have automatically appeared, naming the task parameters containing process_id, subflow_id, and step_key. All good,
- Click Apply Changes
Our Approval Task should now work if we try creating another expense report.
- Go back to our Flows for APEX - Starter Workshop run time app. Select Expense Reports, and Create another expense report.
- Go to My Tasks and approve ** our new claim. Now when we look at this in the **Flow Monitor, we see that our new process is on the Request Payment step. Our Start Event, approval task, and our gateway all work.

Continue Building our Model - Script Tasks and Service Tasks
Let’s go back to the Flow Manager in the Flows for APEX app, and complete what happens to an approved expense report.
Request Payment - PL/SQL Script Task.
In our scenario, once approved, we will have a PL/SQL script that is run automatically to request payment in our payment system. The PL/SQL script will be run by the Flows for APEX workflow engine.
In Flow Management, find our Expense Report diagram, and open it in the Flow Modeler again.
-
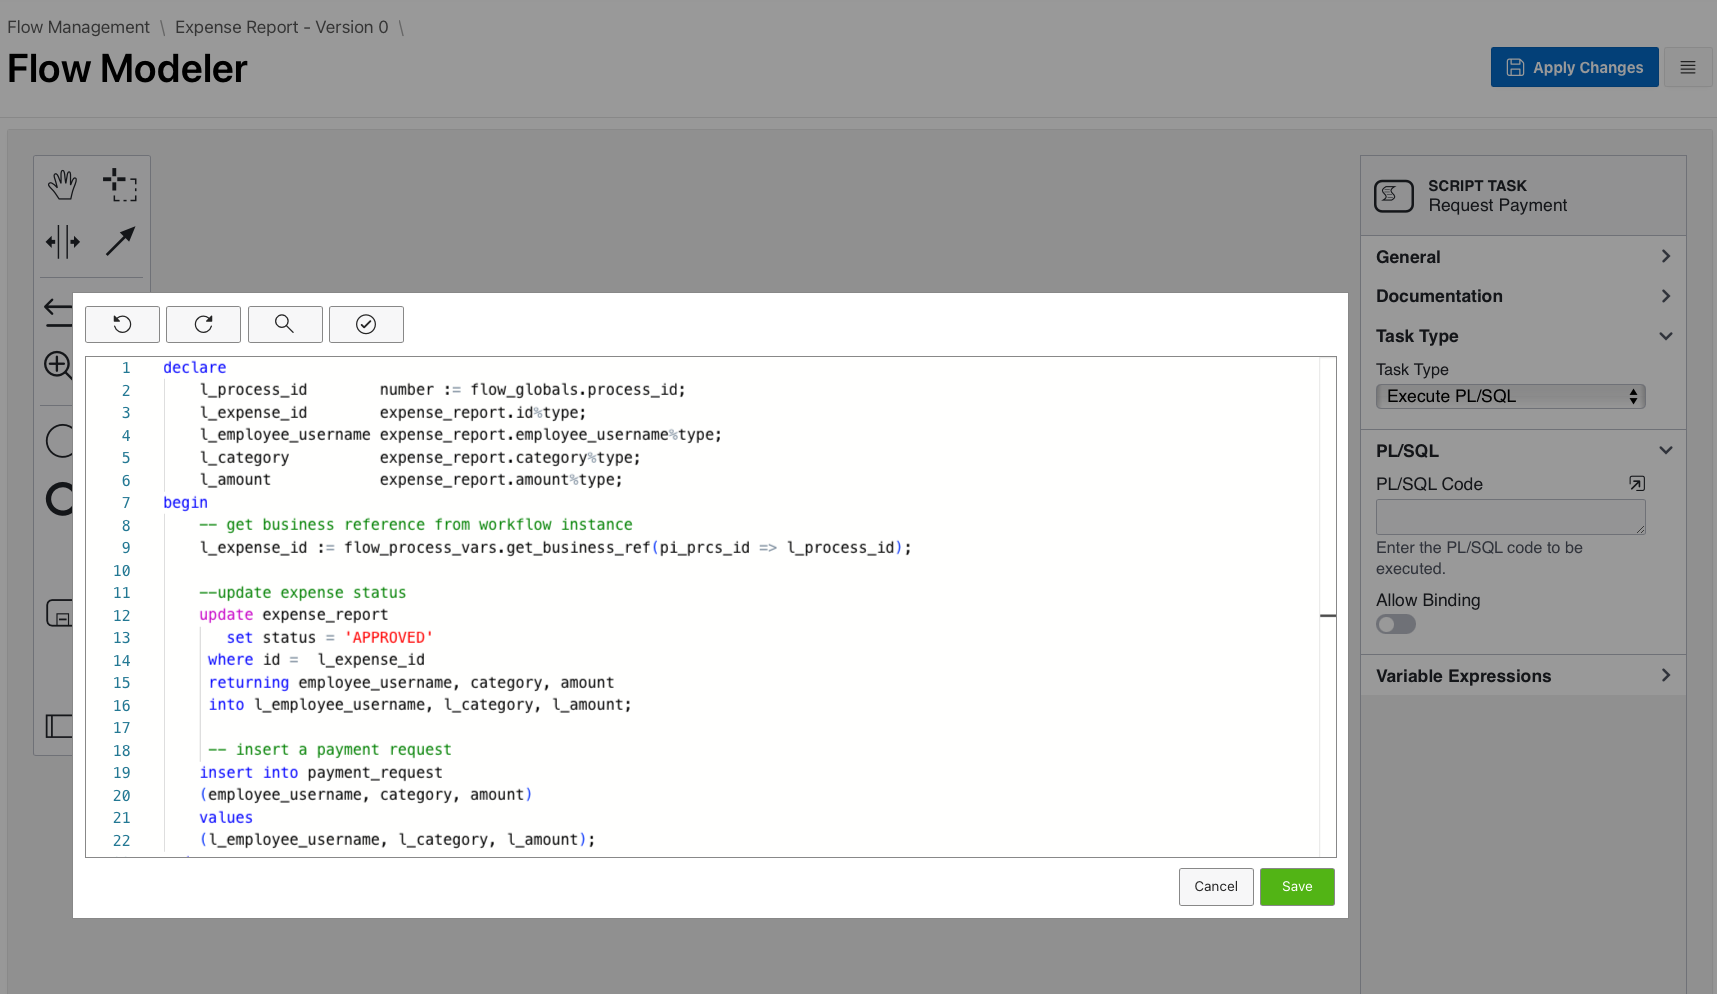
Select the Request Payment task. Use the spanner / wrench tool, change this to a Script Task.
-
Set the Task Type to Execute PL/SQL.
-
Then open the PL/SQL region, and using the open editor icon, open the code editor. Paste in the following PL/SQL code:
declare
    l_process_id        number := flow_globals.process_id;
    l_expense_id        expense_report.id%type;
    l_employee_username expense_report.employee_username%type;
    l_category          expense_report.category%type;
    l_amount            expense_report.amount%type;
begin
    -- get business reference from workflow instance
    l_expense_id := flow_process_vars.get_business_ref(pi_prcs_id => l_process_id);

    --update expense status
    update expense_report
       set status = 'APPROVED'
     where id =  l_expense_id
     returning employee_username, category, amount
     into l_employee_username, l_category, l_amount;

     -- insert a payment request
    insert into payment_request
    (employee_username, category, amount)
    values
    (l_employee_username, l_category, l_amount);
end;
Notice how we are able to get process state (like the
process_idand thebusiness_refof the current process instance inside our script. We can also access any process variables for our current process instance using both substitution syntax (&F4A$MyVariable.) and bind syntax (:F4A$MyVariable) from inside our script.This script is going to get the expense report ID for the instance from the
BUSINESS_REFvariable, and then update the expense report to set it’s status to ‘APPROVED’ and insert a payment request into thePAYMENT_REQUESTStable. -
Validate the PL/SQL code with the Code Validator (Tick Mark button), and click Save.
-
The Binding options below the code editor are important.
If your script code contains references to Flows for APEX process variables, select Allow Binding and then select Bind Process Variables.There is an option to bind APEX page items, which is deprecated, and generally shouldn’t be used – as the page items might not be there when the script is executed, especially if the script has to be restarted after a step failure. Instead, you should make sure that any variables that you need to pass from one process step to another are passed through process variables, which are available for the duration of the process instance. A Flows for APEX process will typically span multiple APEX sessions, and so using APEX page items to store values between process steps is not a good idea.
-
Click Apply Changes to save your model.
We’ve now configured a PL/SQL Script Task. This will be run automatically when the task becomes the current step. When finished, the process will move on to the next step.
Configure a Service Task - Send Email
Our next step in the process sends an email to the employee, notifying them that their expenses are approved and will be paid.
As we are built on top of Oracle APEX, we use the APEX Send Mail functionality - which allows us to easily create email templates and create substitutable emails. We have created an email template for you in advance in the starter APEX application to save time.
- In the Flow Modeler, select the send Email task. Using the spanner / wrench tool, change the standard task to a Service Task.
- Flows for APEX supports several Service Task Types. Select Send Mail.
- Open the Mail region, and configure as below:
- Send Email Immediately: For testing and maybe deployment, set on
- From: your sending email address (e.g., me@example.com). Note: If you are using OCI mail services, the from address needs to be an authorized sender in your OCI mail service configuration.
- Use Template: on
- Use APEX meta data: on
- Application: select the Flows for APEX Starter Workshop app.
- Template: select the Expense Approved template.
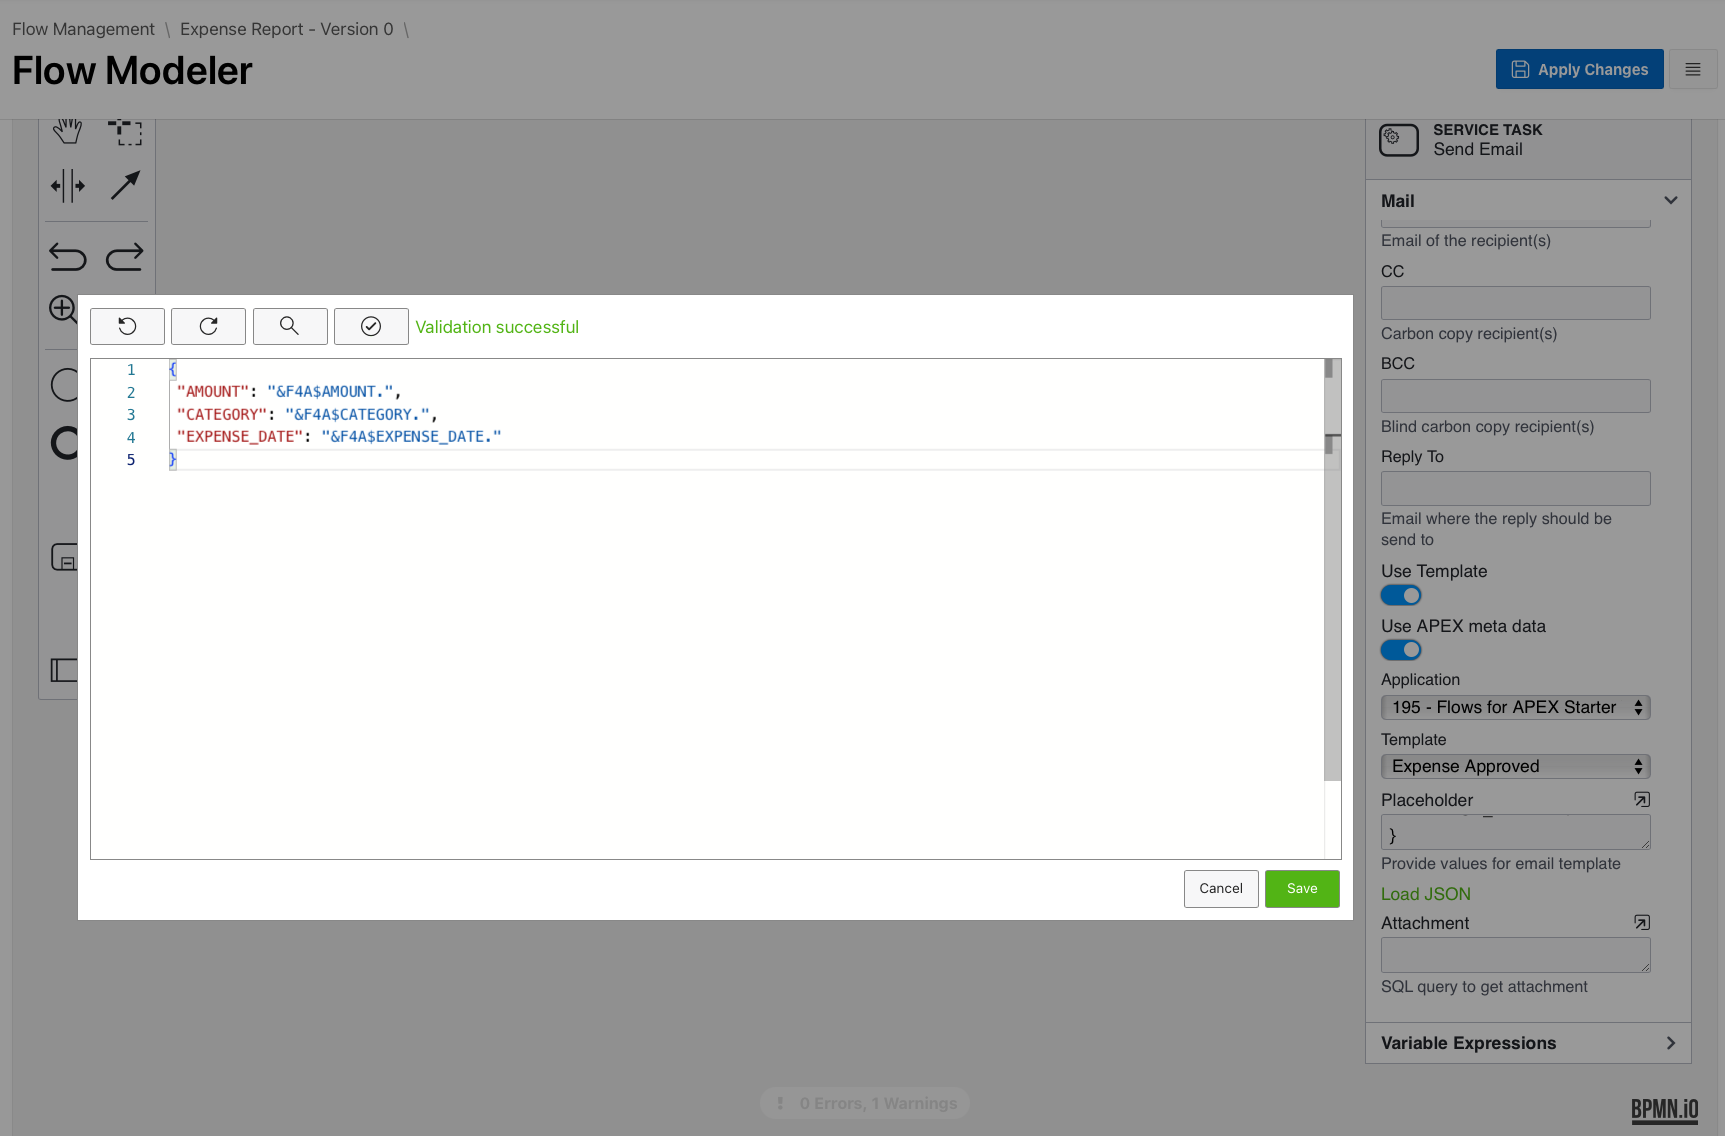
- Placeholder: Click the Load JSON green button & then open the code editor. You will see a JSON document template listing the placeholders required for the selected email template.
- Edit this so that amount, category, and expense_date are linked to Flows for APEX process variables named amount, category, and expense_date. (these don’t exist yet - we’ll set them up next).
- Validate and then Save the placeholders json.
-
Now we need to create Flows for APEX Process Variables to hold these values which are in the expenses table in our system of record, but don’t exist yet as process variables. Flows for APEX includes a variable expression feature which is, essentially a trigger which fires before and after ** each process step to **set process variables based on a static definition, as a copy of another process variable, or as the result of a SQL query, a PL/SQL expression, or a PL/SQL function body. Having this ability to set variables from database queries or expressions as we move through the process instance gives Flows for APEX massive power and flexibility, as these variables can be used as input data for a step and also to control many settings controlling how the step gets executed.
-
We will use variable expressions on the Send Email task that execute before task to set the email addressee, the category, amount, and expense date (as a string) from our system of record for use in our email template.
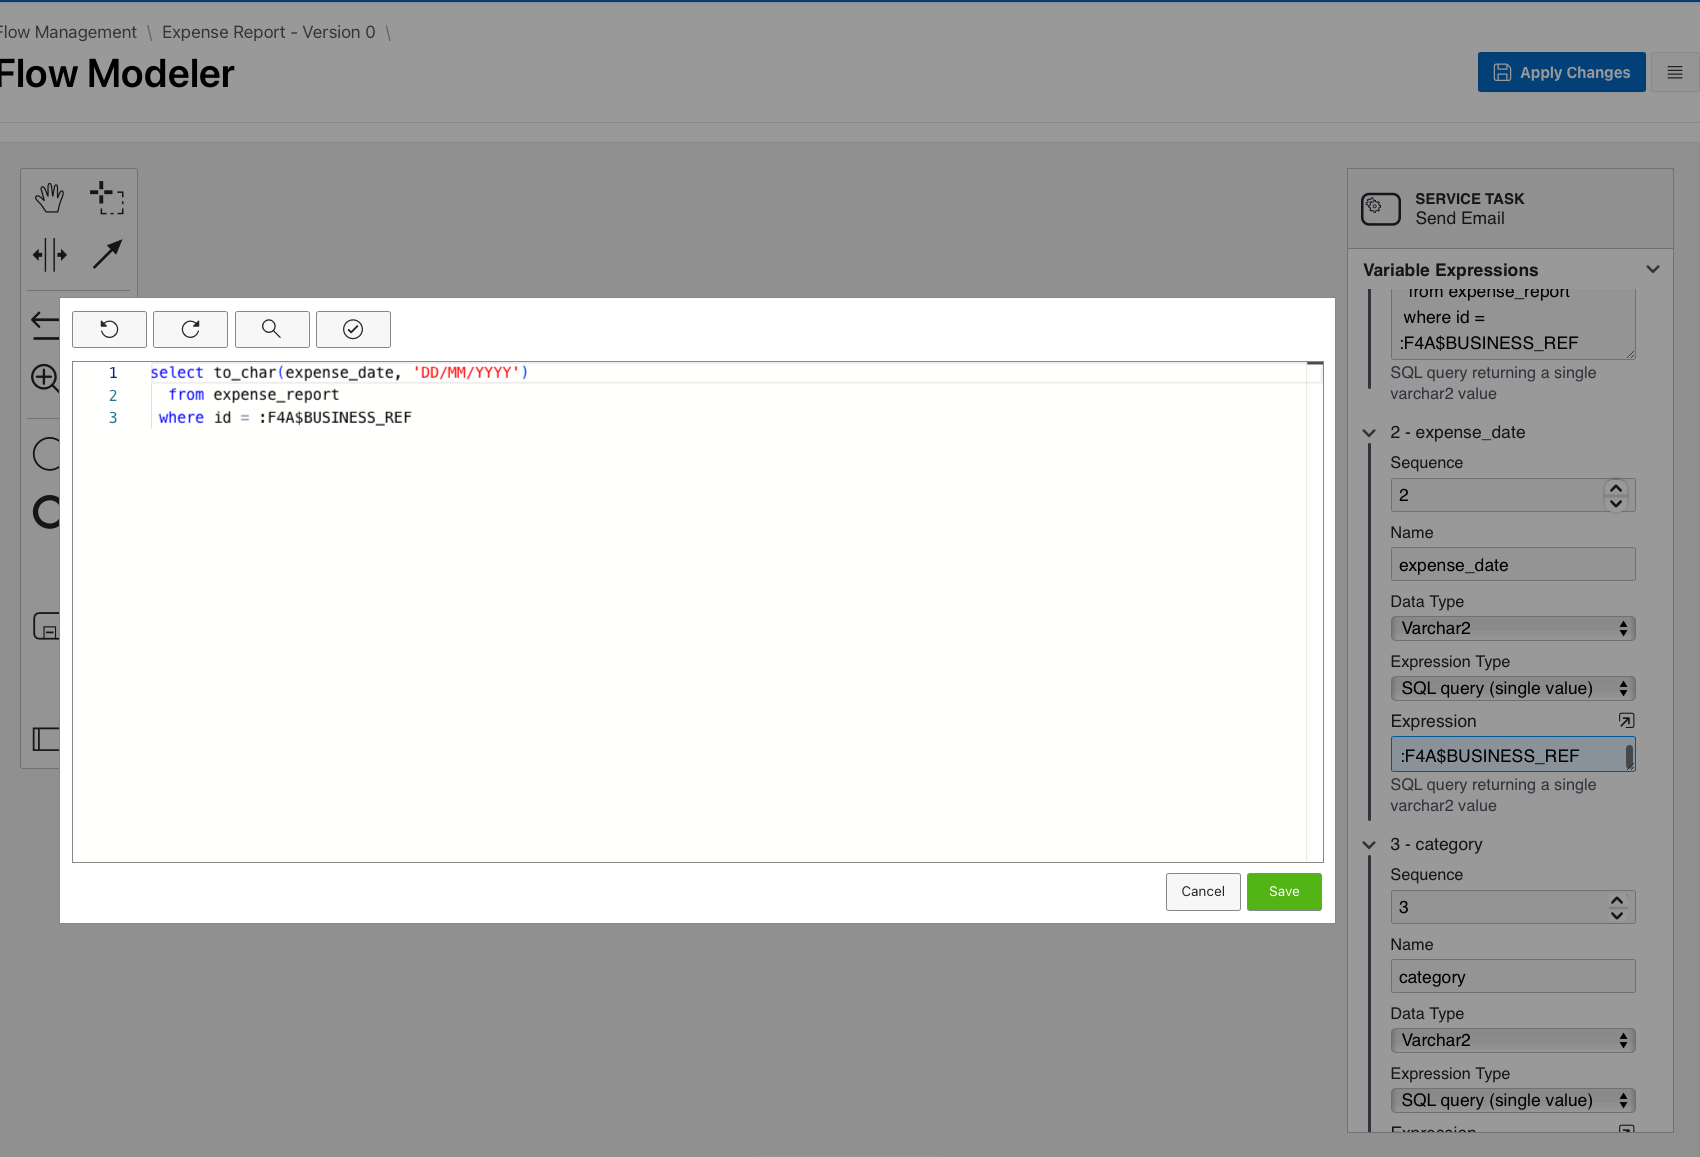
- Open the Variable Expressions region on our Send Email task.
- Sequence:1
- Name: EMAIL
- Data Type: Varchar2
- Expression Type: SQL Query (single value)
- Expression:
select employee_username from expense_report where id = :F4A$BUSINESS_REF- Add another Variable Expression for amount as a varchar2 as a SQL Query with expression:
select amount from expense_report where id = :F4A$BUSINESS_REF- Add another Variable Expression for expense_date as a varchar2 as a SQL Query with expression:
select to_char(expense_date, 'DD/MM/YYYY') from expense_report where id = :F4A$BUSINESS_REF- Add another Variable Expression for category as a varchar2 as a SQL Query with expression:
select category from expense_report where id = :F4A$BUSINESS_REF -
Click Apply Changes.
 This should conclude our Email configuration. You’ve also learnt about variable expressions.
We can test our approved route through the model now.
Test the Approved route
All of the steps should now work if the path is ‘APPROVED.
’
Complete the Rejected route
If our expense report gets rejected by the Manager Approval step, we want to route it back to the originator for them to rework the expense report and resubmit it, For this we want to use an APEX page containing a form on the expense report.
Note we could have used our existing page 3 form - but to keep the page processes simple in this workshop, we have used a separate form page, which has been created in your starter app as page 5, Correct Expense Report. We’re going to link tis in as a BPMN User Task – but this time of type APEX Page Task.
- Open the Flows for APEX app, find our process diagram, and open it in the Flow Modeler.
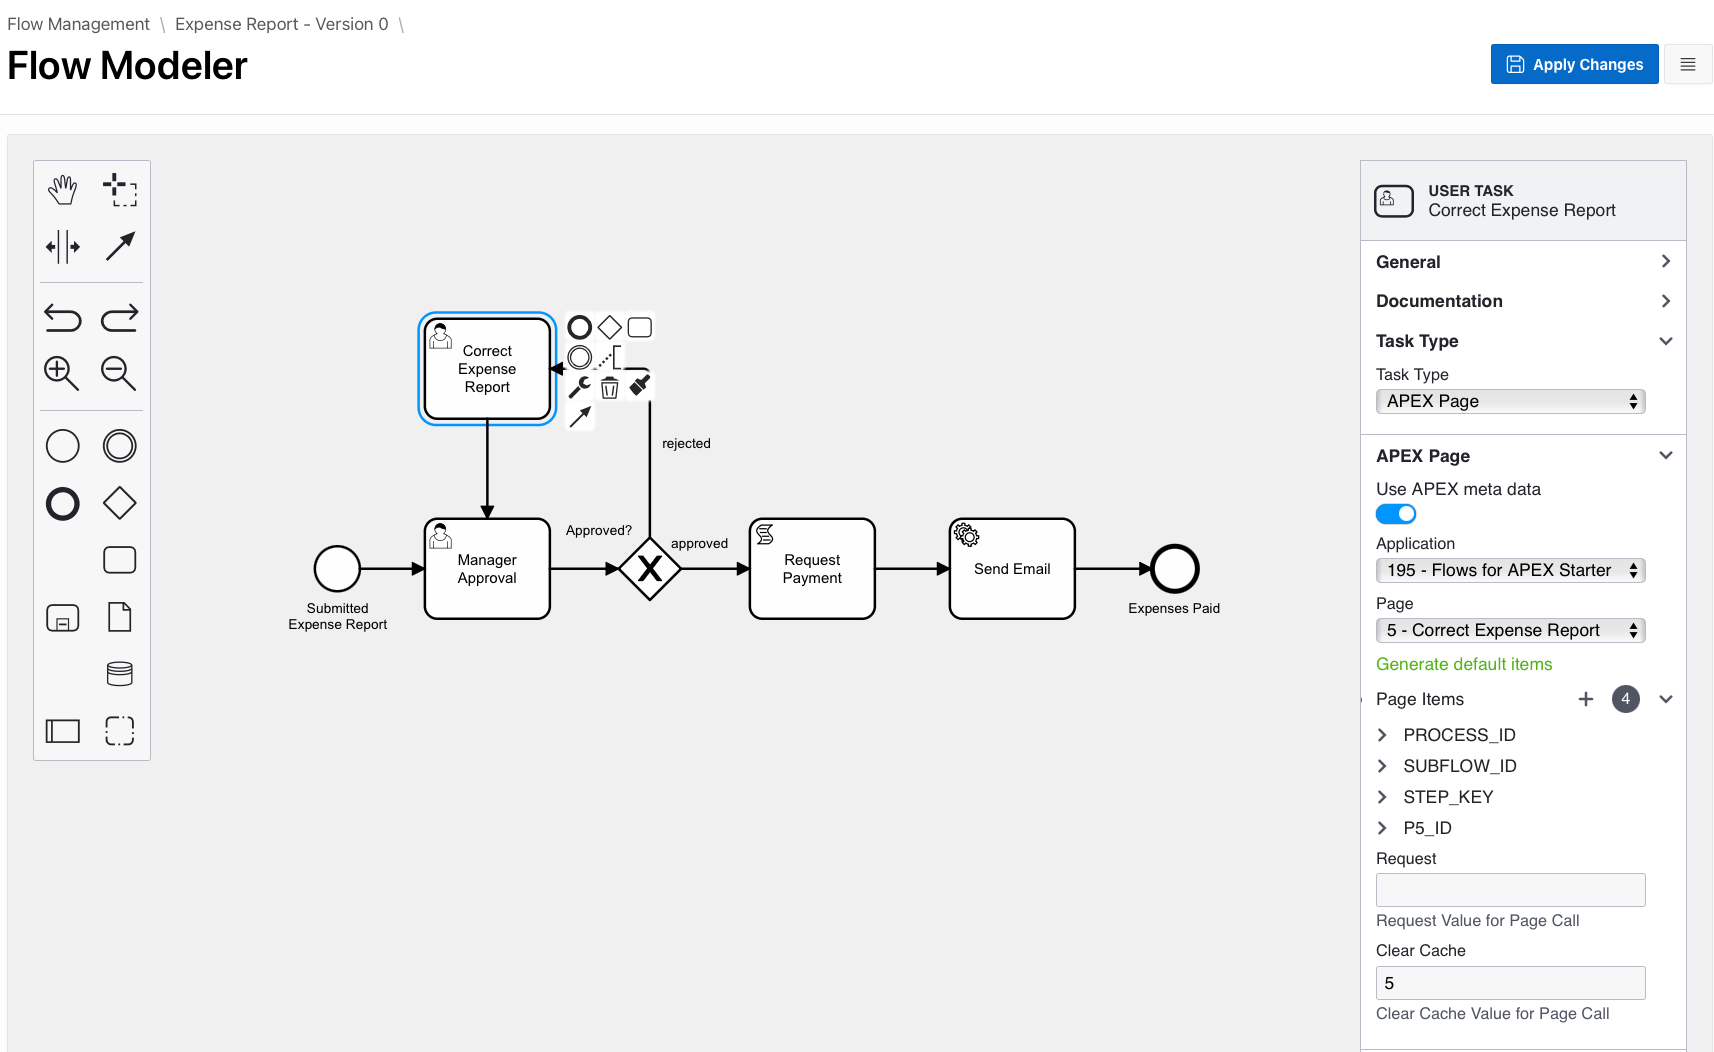
- Click on the Correct Expense Report task to select it. Using the task menu, again select the spanner / wrench tool, and change the task type to be a BPMN User task.
- In the properties panel, open Task Type, and set it to APEX Page.
- Open the APEX Page region, and configure as follows:
- Use APEX Meta Data: on
- Application: Select the Flows for APEX tarter Workshop
- Page: Select page 5 - Correct Expense Report
- Click on the green Generate Page Items link. This generates links to three page items (actually in our case, APEX Application Items) process_id, subflow_id, and step_key.
- Add an additional page Item manually:
- Item: P5_ID
- Item Value: &F4A$BUSINESS_REF.
- Clear Cache for page 5.
- Task Assignment: Potential Owner: Use a PL/SQL function body to
return v('APP_USER');to assign the task to ourselves.
- Apply Changes to save our model.
Now we need do a small change to our Application so that the page steps the workflow forward when the changes are saved.
- Open our Flows for APEX Starter Workshop app in the APEX Application Builder, and open page 5: Correct Expense Report.
- Select the Processing tab on the left panel, right-click on Processes, and add a new process below the existing Process form Correct Expense Report process. (We always put the Complete Flows for APEX step process AFTER the page DML progresses as the workflow engine will commit the work done in the step and the workflow step in a single transaction when the workflow step completes). Configure it as follows:
- Name: Complete Flows for APEX step
- Type: Flows for APEX - Manage Flow Instance Step
- Action: Complete Step
- Flow Instance info: In Page items
- Process ID Item: PROCESS_ID (application item)
- Subflow ID Item: SUBFLOW_ID (application item)
- Step Key Item: STEP_KEY (application item)
- Don’t set Gateway Routing, Auto Branching, or return the Instance and Subflow ID.
- Server Side Condition: When Button Pressed - SAVE
- After Processing add a branch to return to the task list, page 6, when the SAVE button was pushed
We should now have a finished & working application and workflow. Congratulations!
If you want to download a completed application, download from here. Note that the completed application uses a BPMN diagram named Expense Report Solution, rather than Expense Report so that it doesn’t conflict with the starter app. When you install the completed application and then install the Supporting Objects, you will get some errors when supporting objects are installed if you have already installed the starter app. This will be the 2 underlying tables - just ignore this error. The supporting object install will install the completed process diagram for you, however.
Summary
{to be finalized}