Integrate with APEX Task List
Integrate Flows for APEX User Tasks into the APEX Task List
Oracle APEX 22.1 introduced APEX Approval Tasks and provided an APEX Task List as an easy way to present a user with all of their current tasks, across all the applications in an APEX Workspace. The APEX Unified Task List can be generated by the APEX Application Builder, and added at the click of a button as a page in your application. Being generated by APEX, the APEX Task List is fully functional and visually appealing.
Flows for APEX is an open-source business process modelling and workflow engine for APEX that is built on the BPMN 2.0 Business Process Model and Notation standard. Flows for APEX allows a business analyst or a developer to model a business process, and then turn that into an executable workflow application using APEX. Tasks in a Flows for APEX workflow can be built as an APEX Page, or can use APEX Approval Tasks or APEX Action Tasks.
But how do you combine all of the tasks from APEX Approvals, APEX Action Tasks, APEX Workflow, and Flows for APEX into a single, unified, task list for the user?
Let’s start by looking at the database objects that APEX exposes containing a user’s tasks. Then we’ll look at Flows for APEX, and then see how we combine them into a single task list for the user.
APEX Task List
APEX manages APEX Human Tasks - that’s the collective name for APEX Approval Tasks and APEX Action Tasks - inside the APEX engine, and task data is part of the APEX meta-data, maintained and managed for you by APEX.
The task list is exposed through a pipeline table function, apex_approval.get_tasks, which performs several functions. Firstly, it prettifies the internal representation of task data and generates business-user friendly representations of task priority, due dates, age, etc. Secondly, it uses the current user identity to filter out tasks so that a user only sees tasks for which they are a potential owner (if unassigned), or the actual owner (if the task has already been assigned).
Less experienced Oracle developers might not be familiar with a pipeline table function. It’s a PL/SQL function that is provides inside the apex_approvals package, and it can be made to look like a table. You can select data from the function using syntax like this:
select *
from table (apex_approval.get_tasks (p_context => 'MY_TASKS');
The context parameter can be used to change the tasks that are returned. MY_TASKS returns the user’s current tasks, other settings allow you to return just the tasks originated by a user or the tasks for which the user is a business administrator. See the APEX PL/SQL API Reference for more information.
By default, meaning that unless you filter it in your query, this function will return all tasks in the workspace for which the user is the either current task owner or, for any tasks which are currently unassigned, any tasks for which the user is a potential owner. These are not just in the current application, but across all applications and workflows in the APEX workspace.
Flows for APEX Task List
In BPMN-speak, human tasks are referred to as UserTasks. Flows for APEX manages a series of tasks and events as part of a business process modelled in BPMN. User tasks in Flows for APEX can be implemented in your APEX application using one of:
-
An APEX Page, built as part of your application.
-
An APEX Human Task (APEX Approval Task or Action Task).
-
A Simple Task, new in Flows for APEX v24.1, which automatically generates an APEX page for data input from a JSON definition of the required data, without requiring APEX development.
If the task is an APEX Human Task, the task itself is managed by APEX, and so will automatically be included in the APEX Task List. APEX Page Usertasks and Simple Tasks are not managed by APEX - and so we need to add them to the Task List.
Flows for APEX contains a pipeline table function, flow_api_pkg.get_current_task that returns information about these user tasks in the same format, and with the same column names, as the APEX task list. In addition, it contains a few extra columns needed for Flows for APEX tasks. This function also works at APEX Workspace level, so includes a users tasks from all of the business processes running in your APEX Workspace.
And Flows for APEX ships with a view that combines output from the APEX and Flows for APEX pipeline table functions, named flow_apex_my_combined_task_list_vw. So if we select from this view, we will see all of the current tasks for a user, including all of the tasks currently managed by APEX and all of the tasks managed by Flows for APEX.
💡**Note:** Flows for APEX 23.1 didn’t automatically create this view for you as part of the standard Flows for APEX installation, as Flows for APEX 23.1 was supported on older versions of APEX before APEX Human Tasks. But if you have Flows 23.1 and APEX > 22.1, you can install this view manually. You will find the view in a file
flow_apex_my_combined_task_list_vw.sqlin the install directories, or you can also download it from the release assets on GitHub at https://github.com/flowsforapex/apex-flowsforapex/releases/tag/v23.1. Releases of Flows for APEX from 24.1 onwards install this view as part of the product installation.
Configuring the APEX Task List Region
So now you understand the basics of what’s going on behind the scenes, let’s configure our APEX Task List to be truly the Unified Task List that was promised for your workspace!
You create a Unified Task List page from the Application Builder Page Creation Wizard, and APEX generates all of the page layout and logic for you.
Once you have created the task list page, open it in Page Designer, select the My Tasks Report region, and find the region source generated by APEX. It should be the pipeline table function based on apex_approval.get_tasks.
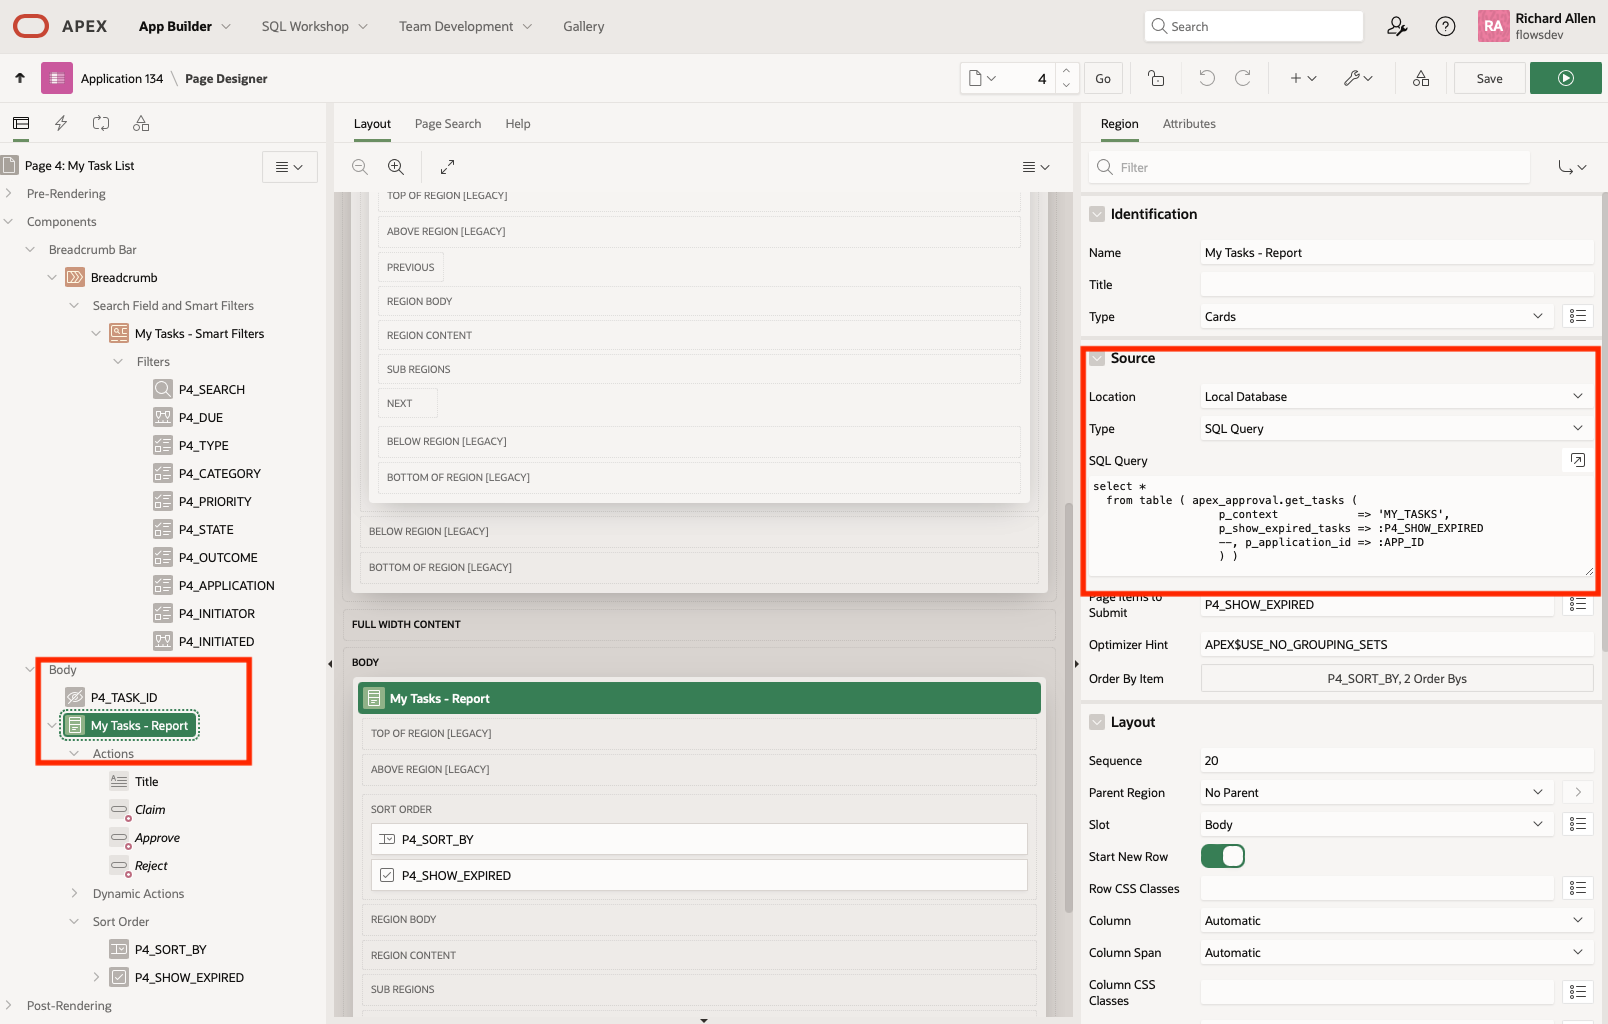
Change the region source to a general query on the flow_apex_my_combined_task_list_vw view that we discussed above.
select *
from flow_apex_my_combined_task_list_vw
Save and run your page. Now you see that we get Flows for APEX tasks and APEX Tasks in the Task List.
Further Enhancing the Task List
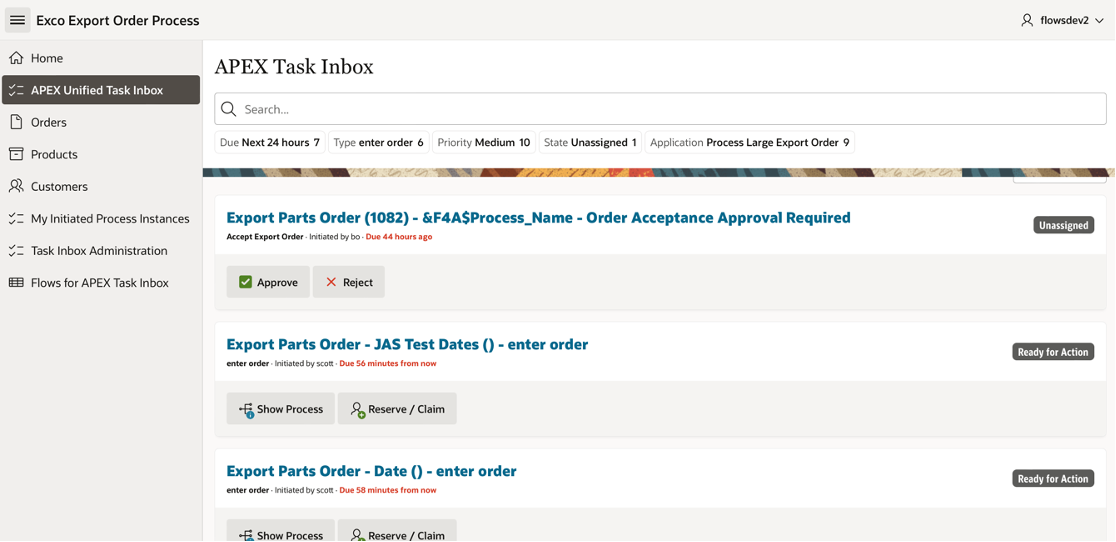
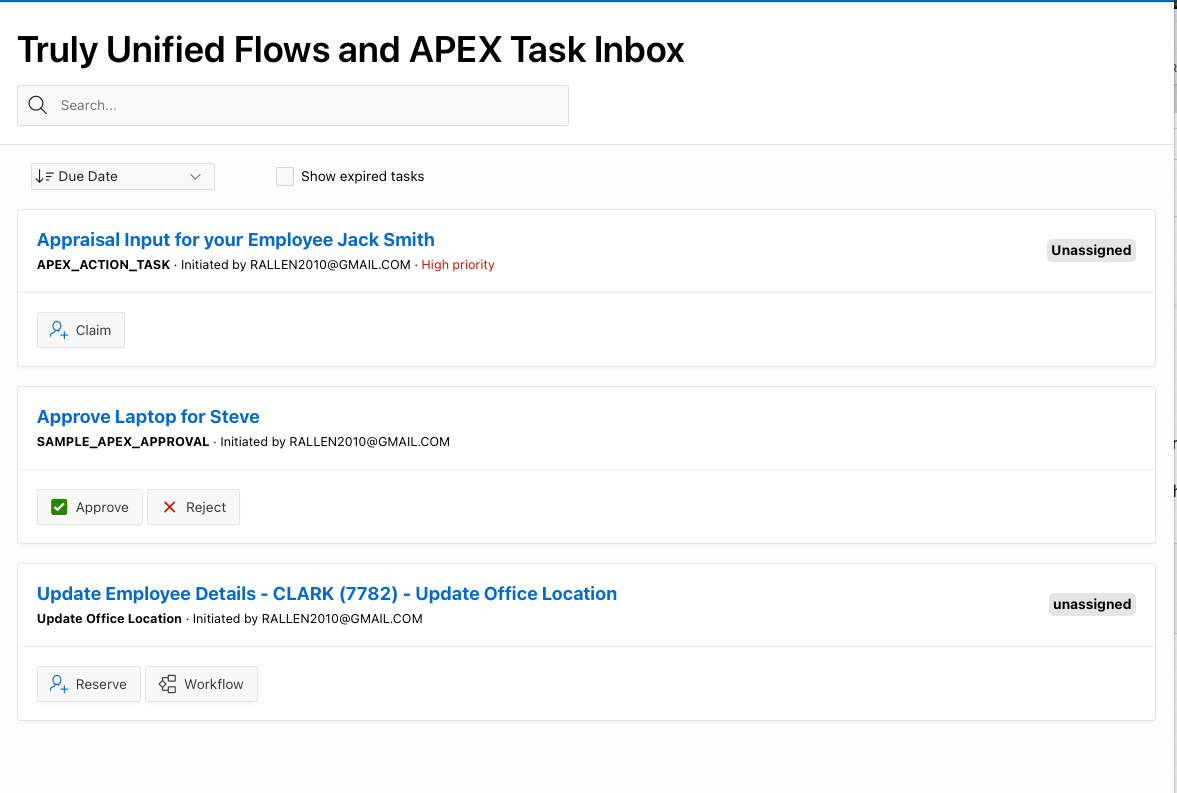
The task list generated by APEX contains short-cut buttons that allow a user to Approve or Reject any APEX Approval Tasks directly from the task list, without having to open the task detail page. These are already only visible if the task_type = ‘APPROVAL’ - so this is good. There is also a Claim button, which shows for APEX Tasks which are unassigned.
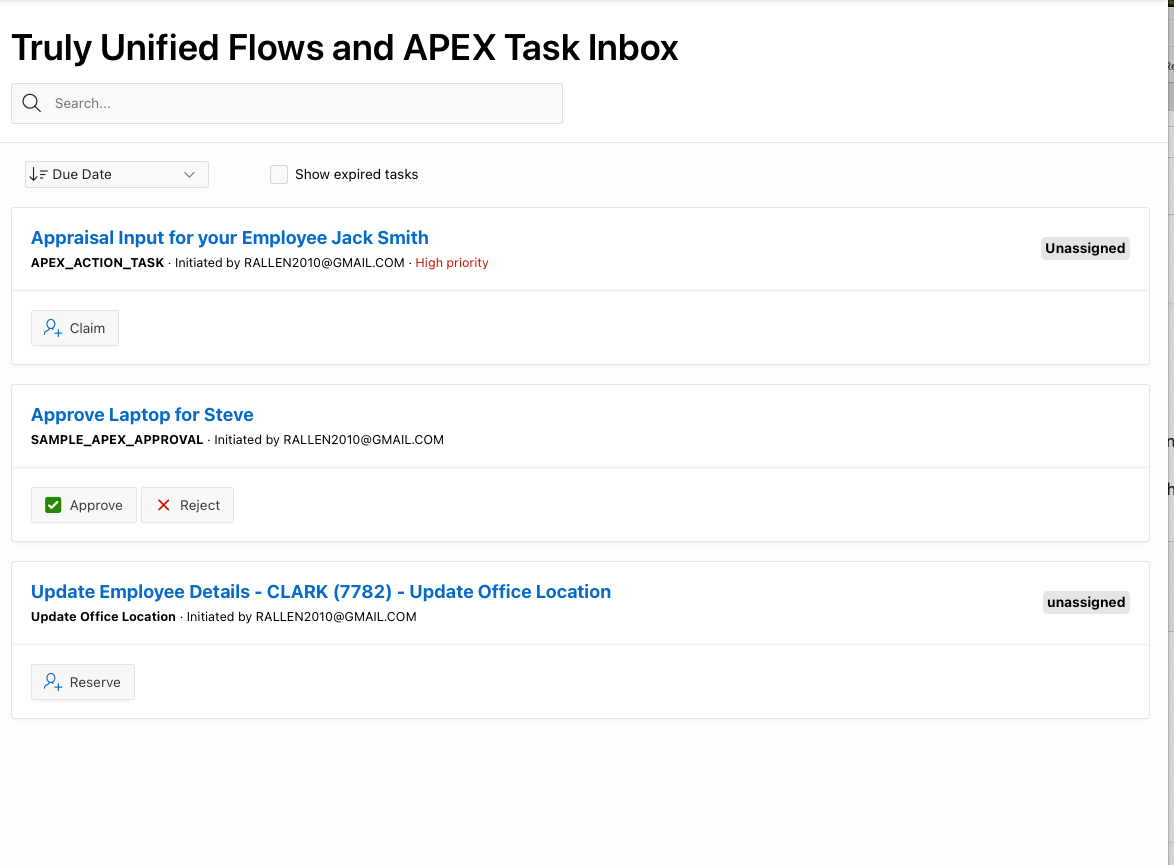
In the screenshot below, you can see an APEX Task List containing 3 tasks. From top to bottom:
-
‘Appraisal Input for your Employee Jack Smith’. This is an APEX Action Task. The task is currently unassigned, and so it displays a
Claimbutton. The card title is clickable, and takes you to the task detail page for the Action Task, as defined in the task definition (in Shared Components). -
‘Approve Laptop forSteve’. This is an APEX Approval Task. It’s currently assigned to me, and has the two quick action buttons displayed,
ApproveandReject. The card title is clickable, and takes you to the task detail page for the Action Task, as defined in the task definition (in Shared Components). -
‘Update Employee Details - CLARK (7782) - Update Office Location’. This is a Flows for APEX ‘APEX Page Task’. Currently, only the card title is clickable - and takes you to the page that you defined in the UserTask definition on your BPMN diagram.
What other buttons could we add to make Flows for APEX tasks better for the user?
-
For Flows for APEX Page Tasks, we can add a
Claimbutton reserve tasks, similar to claiming on APEX Tasks. we’ll do this by modifying the logic on the. existing Claim button. -
For any task that’s part of a Flows for APEX workflow, we can add a
Show Workflowbutton to show the current progress in performing the workflow.
-
Add Task Reservation / Claiming for Flows for APEX Tasks
We’re going to add a Reserve button just for Flows for APEX Page Tasks.
-
Start by adding 3 hidden page items in the body region. In our example, our menu is on page 11, so create
-
P11_PROCESS_ID
-
P11_SUBFLOW_ID
-
P11_STEP_KEY
-
They can all be defined as Type: Hidden, data type Varchar2, stored Per Request.
-
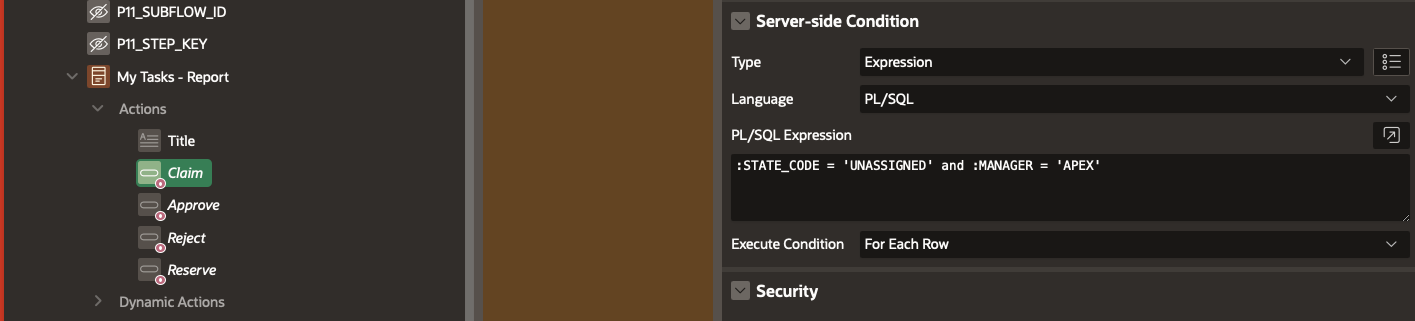
Modify the existing
ClaimAction in the My Tasks Region so that it only applies when tasks are APEX Human Tasks. Our view contains a column,MANAGERwhich is set toAPEXorFlowsForAPEX- so alter the Server Side Condition so that it only applies to tasks coming from APEX.:STATE_CODE = 'UNASSIGNED' and :MANAGER = 'APEX'
-
Next create anAdditional Action,
Reserve. Set the attributes as follows:-
Type: Button
-
Label: Reserve
-
Layout - Position: Secondary
-
Link: Redirect to URL, target #
-
Link attributes:
data-processid="&PROCESS_ID." data-subflowid="&SUBFLOW_ID." data-stepkey="&STEP_KEY.-
Appearance: Display Text with Icon
-
Icon: fa-user-plus u-hot-text (copied from Claim)
-
Css Classes: reserve
-
Server Side Condition: PL/SQL Expression
-
:MANAGER = 'FlowsForAPEX' and :ACTUAL_OWNER is null
-
In the Events tab of the Dynamic Actions pane, we’re going to create an Action for our Reserve button. Start by clicking on the
ClaimClick, and duplicating it. Name the new copyReserveWe’ll start by picking up the process_id, subflow_id, and step_key into the 3 page items that we created in step 1 above. Replace the existing Set Value with these three entries:
-
Set the first Set Value as follows:
-
Name: Set Flows Process ID
-
Action: Set Value
-
Javascript Expression -
this.triggeringElement.dataset.processid -
Affected Element: Item - P11_PROCESS_ID
-
-
Again, for Subflow ID
-
Name: Set Flows Subflow ID
-
Action: Set Value
-
Javascript Expression -
this.triggeringElement.dataset.subflowid -
Affected Element: Item - P11_SUBFLOW_ID
-
-
And finally for Step Key
-
Name: Set Flows Step Key
-
Action: Set Value
-
Javascript Expression: -
this.triggeringElement.dataset.stepkey -
Affected Element: Item - P11_STEP_KEY
-
-
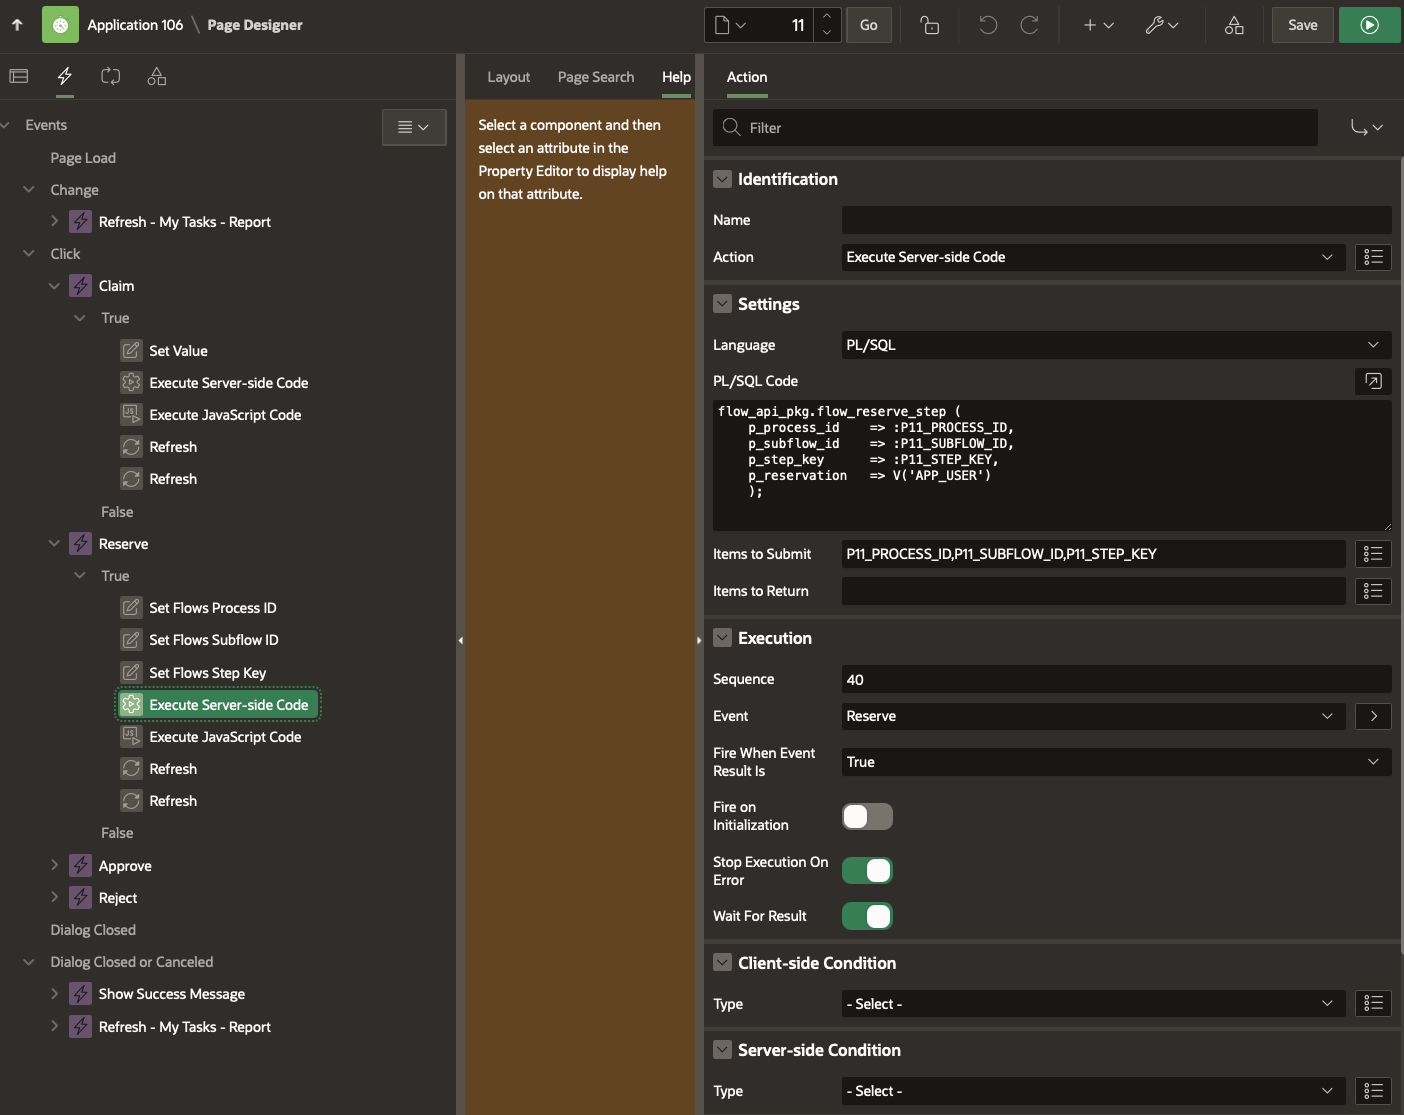
Execute Server Side Code. We’ll call the Flows for APEX API to reserve. the step for the current user.
-
PL/SQL Code as follows:
-
Passing In P11_PROCESS_ID, P11_SUBFLOW_ID and P11_STEP_KEY
  flow_api_pkg.flow_reserve_step (
   p_process_id    => :P11_PROCESS_ID,
   p_subflow_id    => :P11_SUBFLOW_ID,
   p_step_key      => :P11_STEP_KEY,
   p_reservation   => V('APP_USER')
   );
-
-
Keep the Execute Javascript Code step that you copied from Claim.
-
Also keep the 2 Refresh steps copied from claim.
-
Now save your page and test it.
-
Our Task List now has the Flows for APEX Page Task looking and behaving similar to the APEX Human Tasks…
-
Adding a Workflow Progress button wth the Flow Viewer
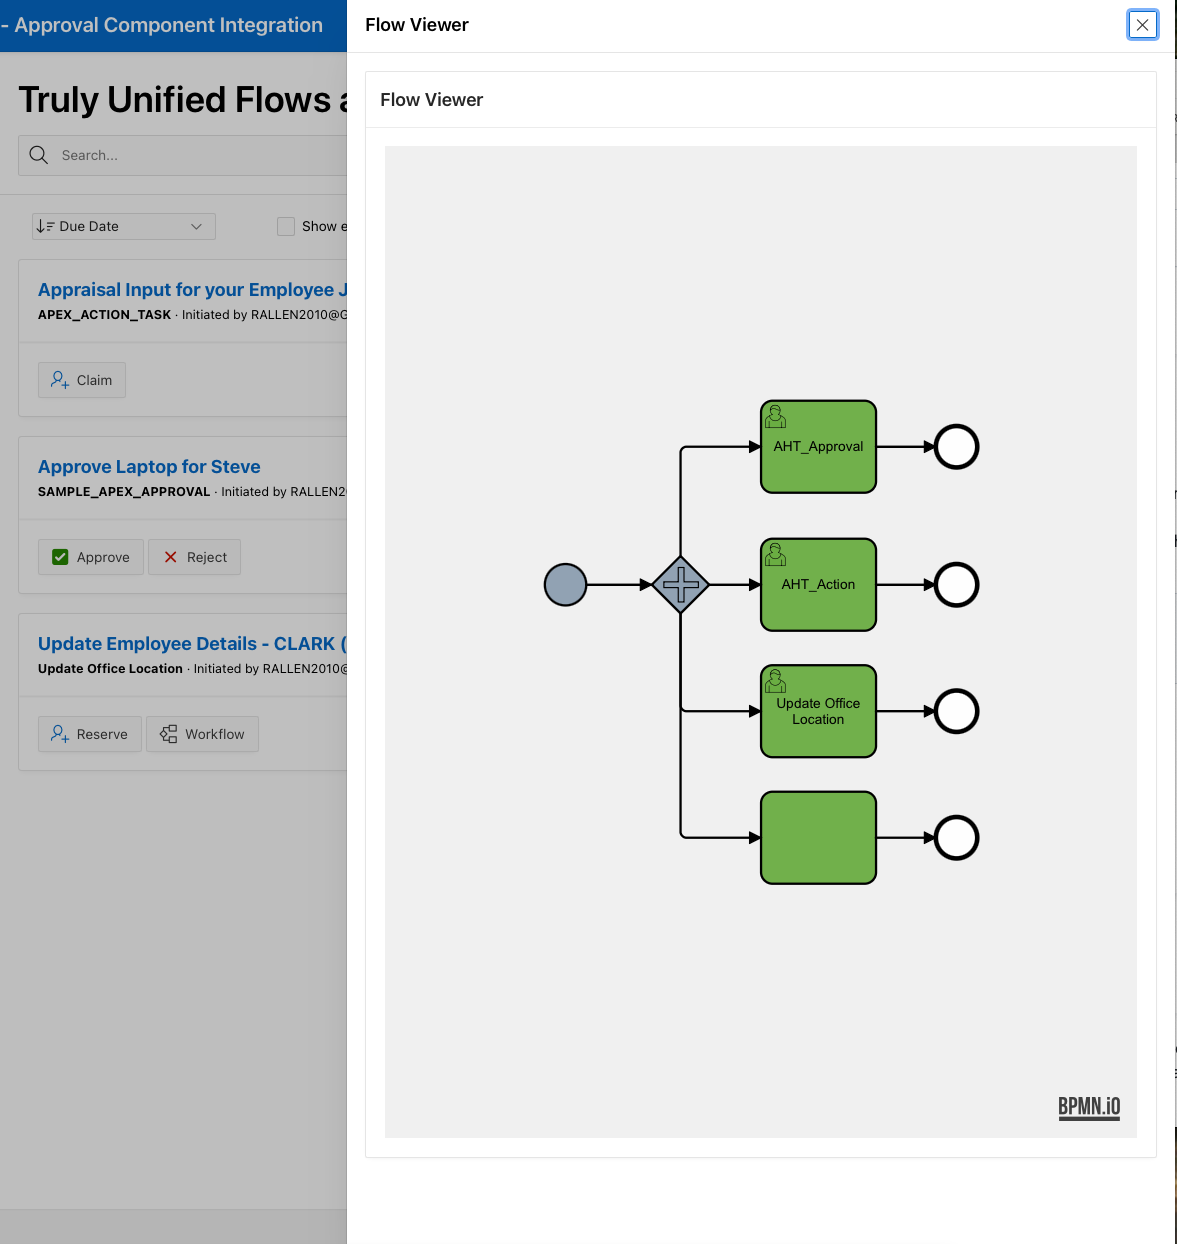
Let’s also add a Flow Viewer to any of the tasks that are managed as part of a Flows for APEX Workflow.
We can do this by creating a modal drawer page for the Flow Viewer, and adding an Action and Event to launch the Viewer.
-
Ensure that you have the Flows for APEX Flow Viewer plugin loaded into your app.
-
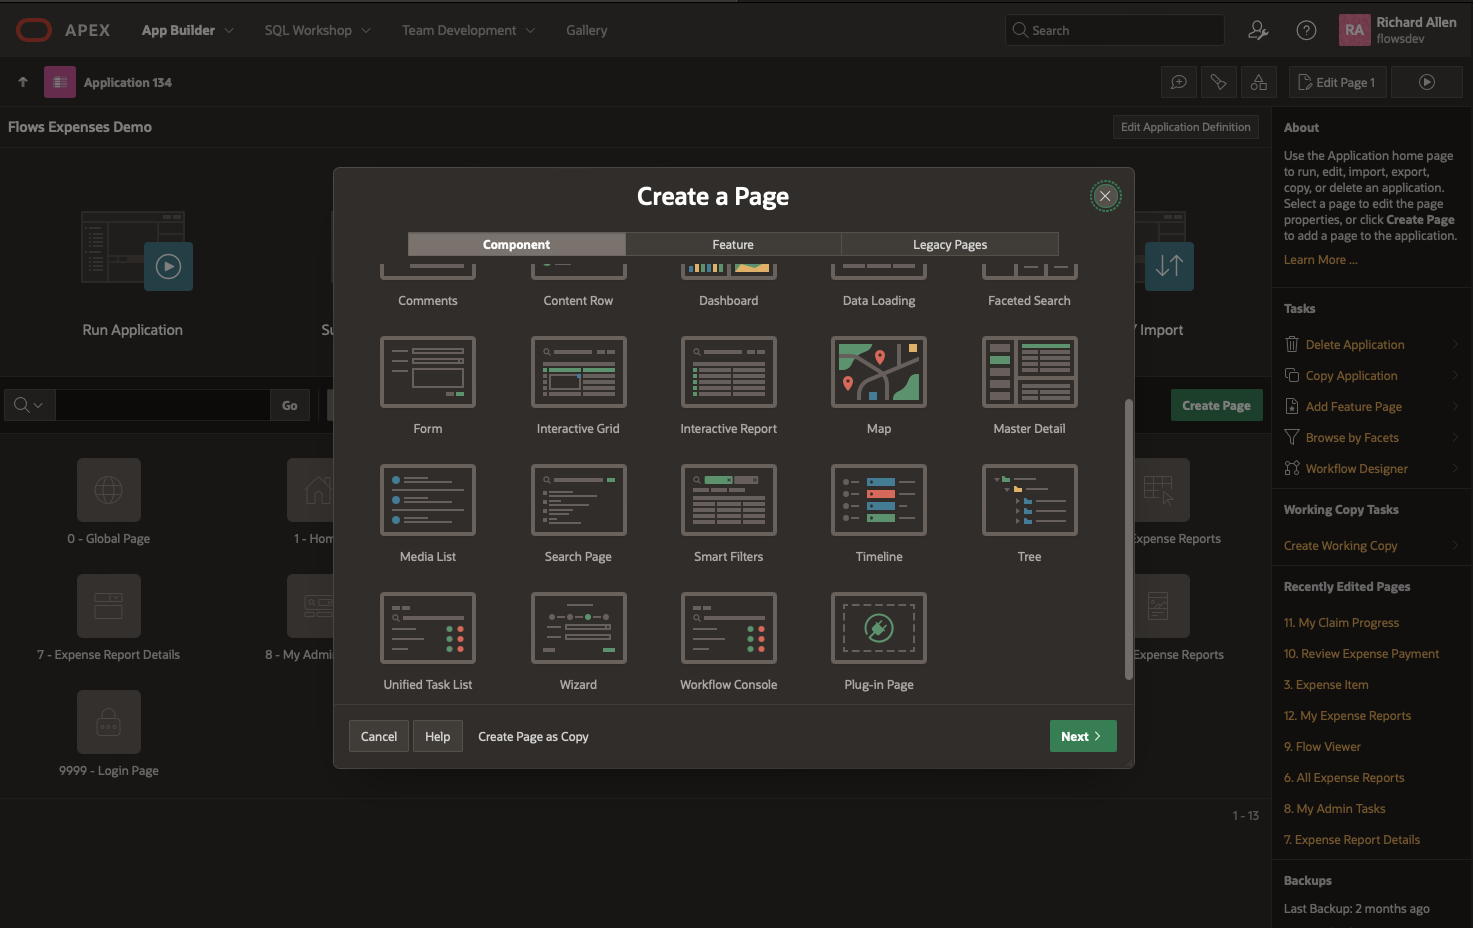
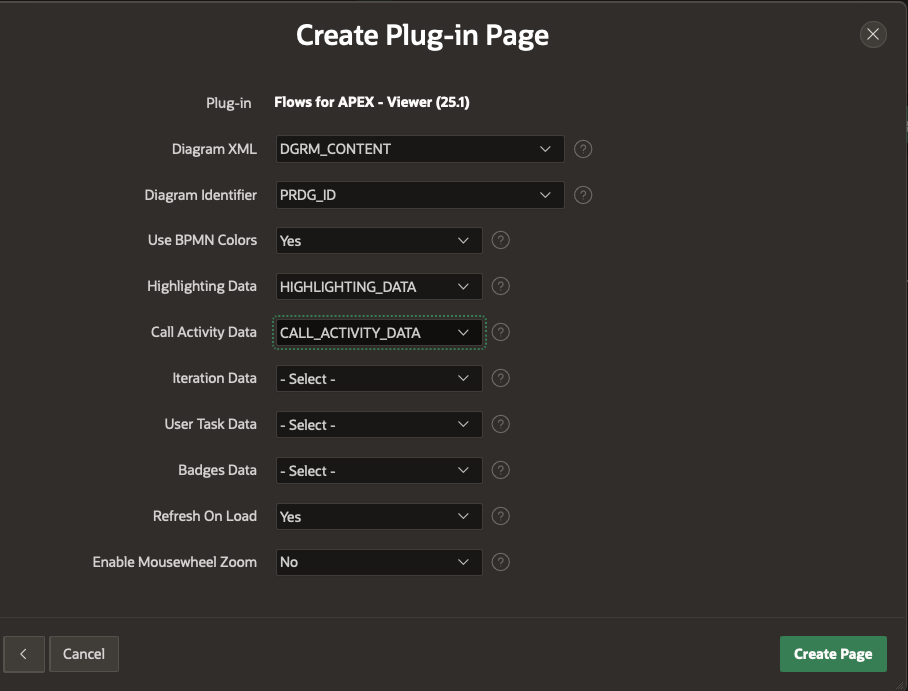
From Application Builder, click Create a Page and select Plug-in Page from the modal popup. Click ‘Next’.
-
Select the ‘Flows for APEX Viewer’
-
Page Name: Flow Viewer, Mode: Drawer Data Source: FLOW_VIEWER_VW
-
Select the appropriate columns (names should be obvious). You’ll want to show at least the items below…
-
Create the page.
-
Add a Page Item to the Content Body for Process ID and make it Hidden
-
Save the page. In our case, this created Page 18.
-
Create a new Action on our Task List Page. Configure as follows:
-
Button. Label: Workflow
-
Layout - Position Secondary
-
Link Type: Redirect to Page in this Application, targeting your Flow Viewer page, passing
process_idtoP18_PROCESS_ID
-
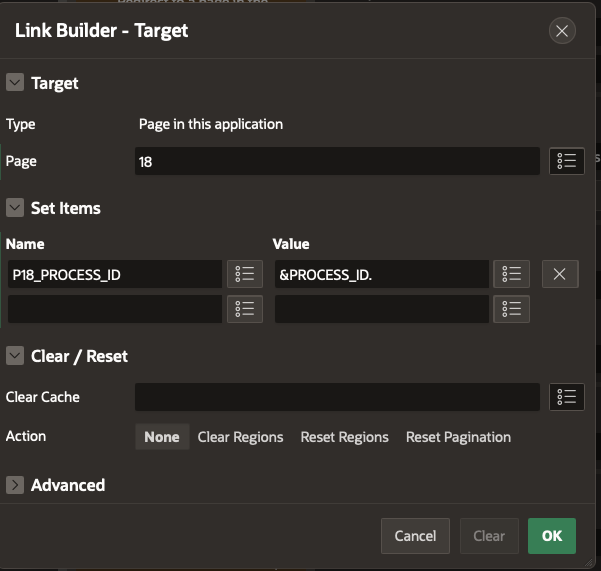
-
Appearance: Text with Icon, using icon fa-workflow
-
Server Side Condition:
:MANAGER = ‘FlowsForAPEX -
Save and Test. You should now have a Task List looking like this…
and clicking the Workflow button brings up the Flow Viewer like this…